MoP Tailoring Guide (1-600)

Approximate Materials Required for 1-600:

  • 260 Linen Cloth
  • 135 Wool Cloth
  • 620 Silk Cloth
  • 456 Mageweave Cloth
  • 780 Runecloth
  • 790 Netherweave Cloth
  • 20 Knothide Leather
  • 20 Infinite Dust
  • 20 Eternal Life or Fire or Shadow
  • 1200 Frostweave Cloth
  • 885 Embersilk Cloth
  • 30 Hypnotic Dust
  • 320-410 Windwool Cloth

Tailoring Leveling Guide 1 – 75

First, visit any trainer in the main cities of old Azeroth –
just ask a guard, and learn Apprentice Tailoring. You can buy “Threads” and “Dye” from the Tailoring supply vendors.

Stop making these if you reach Tailoring 45, and make more only if you need it.

Levels 75 – 125

Levels 125 – 205

Levels 205 – 300

Learn Tailoring Artisan.

  • 280 – 295
    18 x [Runecloth Gloves] – 90 Bolt of RuneclothRecipe goes yellow at 290, get enough materials for 18.

Levels 300 – 350

Levels 350 – 425

Keep these, you will need them later.

Make a few [Duskweave Leggings]
if you didn’t reach 405.

– 10 Bolt of Imbued Frostweave, 20 Eternal Life, Fire or Shadow

You can also make [Frostweav Bag] instead of these. It will cost you a lot more gold to level with the bags,
but when you sell
all of them at the Auction House, you will get most of your gold back.
You will need to make more Bolt of
Imbued Frostweave if you level with bags.

Levels 425 – 500

Visit your trainer and learn Tailoring Illustrious.

  • 480 – 484
    4 x [Spiritmend Leggings] – 16 Bolt of Embersilk ClothIt is really important to stop making these at 484!
  • 484 – 494
    2 x [Embersilk Bag] – 30 Bolt of Embersilk Cloth, 30 Hypnotic DustYou will get 5 skill points for each bag. You can also make two [Otherworldly Bag] instead of the Embersilk Bags, but it is usually harder to sell.

Levels 500 – 600

Visit your trainer and learn Zen Tailoring.

  • 550 – 555
    1 x [Imperial Silk] – 8 Bolt of Windwool ClothYou can craft this item if you visit The Silken Fields at the center of Valley of the Four Winds. This is a level 86 zone but you can easily go there at Level 85. The Silken Fields are south-east from Halfhill.
  • 555 – 600
    9 x [The recipe you discovered from making Imperial Silk] – 36-54 Bolt of Windwool ClothEvery recipe that you can discover will grant you 5 skill points, but the number of cloths required to make them is different. If you didn’t discover a Dreadful Gladiator PvP item recipe, but an epic item recipe, you will have to make another Imperial Cloth the next day, or until you discover a pvp item recipe.
post

Molten Core Boss Guide – Garr

Garr is a large Obsidian elemental and the fourth boss of Molten Core. With him are eight Firesworn elites.

This text segment by Spoogen follows up on the video created by Raserisk

GARR Breakdown

Firesworn:

These are the 8 elementals surrounding Garr. These spicy bois dish out some nasty IMMOLATES. (MDEBUFF – Dispel/Cleanse) If you kill one, you better watch out because Martydom, is an understatement. The Firesworn will hit you with ERUPTION upon being killed. Which will knock all nearby players away….. if they survive the damage. (Make sure your raid communicates when these are going to die, or you will get blowededed up and wipe)

Firesworn deaths make Garr do more damage. Be smart with kill order, and get your Banishes on LOCK. (As many targets as possible)

Don’t move the firesworn too far away from Garr, this will make them activate SEPARATION ANXIETY, which is basically a tantrum, making them flex and become immune to CC.

Garr:

Now to cover Garr’s abilites. Garr is a basic boi and only has 2 abilites to watch out for.

ANTIMAGIC PULSE is an AOE dispell. So make sure you stack trash buffs (to be dispelled instead of the important buffs) before the fight like underwater breathing….. because breathing underwater, is not cool.

MAGMA SHACKLES is the 2nd ability to consider. This is an AOE movement speed debuff for your party. (Lowered to 40% of normal)

Basic Strat:

Step 1: Banish 3-4 Firesworn + Main tank hits Garr with ” What are those?” enraging him and pulling agro
Step 2: Off-Tanks will tank the rest
Step 3: Kill Firesworn in a spot that won’t wipe the raid
Step 4: Focus Garr after 3-4 Firesworn are dead
Step 5: Kill Banished Firesworn after

An Alt strat would be to kill all ADD’s first, however this will fully power Garr up. (Make sure your healers/Tank know what they’re doing if you pick this alt strat)

Advanced Strat:

Step 1: Main tank holds all ADDs in corner (Heavy heals are needed on tank to accomplish this)
Step 2: DPS Burns Garr down first, then adds after

Use free action potions if needed, otherwise you’re off to Baron Geddon !

post

MoP Horde Leveling Guide

This MoP Horde Leveling Guide is aimed at showing you where to level more-so than walking you through each quest.

Tauren Starter Area

If you’re a tauren, you’re probably going to start in Mulgore. The first things you’re going to do is follow the starter quest chain up to level 10. Once you finish with that, head over to Thunderbluff. you should automatically learn the flight paths. Now you can fly to the barrens.

Orc Starter Area

As an Orc, you can do the simplest quests, kill these, collect that etc.
Skip everything in Durotar except for the beginning quests.
Once you hit level 10, you’ll start moving to the start of the barrens,
Do not go to the Crossroads until you hit 12 or 13 unless you really have to.

Troll Starter Area

Same as Orc’s

Blood Elf Starter Area

Do the starter chain quests until you get to Silvermoon.
There should be a portal in a building at the top of the map.
It looks like a ball of light.
This will port you to the Undercity.
Leave the Undercity and go to the ship towers.
Once there take the portal to Orgrimmar.

Undead Starter Area

Either do the starting quests here or grind until level 5.
At level 5 go to the nearby towns and level to 10.
Head to the ship towers and take the portal to Orgrimmar.

10-20

Crossroads
At level 10+ locate a nearby flight path and fly to the Crossroads.
If you get stuck in the middle of the quests in the Barrens or want a change of scenery, try heading to Azshara. Azshara will have plenty of quests to reach level 20.

20-25

Ashenvale
Head to Ashenvale quest here as best you can. It may be a bit crowded but make sure to at least hit level 25.

25-30

Stonetalon Mountains
Once you reach level 25, fly over to Stonetalon Mountains. Start from the top and work your way to the bottom. When you hit level 35 you will almost be in the Southern Barrens.

30-40

Southern Barrens
This is where you should level from 30 to 40.

40-45

Dustwallow Marsh
At level 40 you should go to Dustwallow Marsh. This place has plenty of simple and easy quests. It’s a long run/walk but it’s a great place to level till 45.

45-50

Tanaris
After level 45 fly to Tanaris and start questing there.Don’t bother with the arena quest, it’s a waste of time waiting on the mobs. Stay in Tanaris until you reach level 50.

50-55

Un’goro Crater
At level 50 fly to Un’goro Crater and quest there until 55.

55-62

Winterspring
Head to Winterspring once you hit 55. You should stay here until at least level 62 to avoid Hellfire. If you really want to though, you can go to Hellfire at 58.

62-65 / 66

Zangarmarsh
You should stay here until level 65, It’s a really good area for 62 to 65.

Levels 66-68

Nagrand
You’ll need to stay here until level 68, make sure you do the Nagrand arena chain because it is really good experience, gold and a weapon at the end!

68-76

Borean Tundra, Dragonblight and Zul’drak
When you reach level 68, Head over to Shattrath and use the portal to Orgrimmar. Head over to the Borean Tundra ship. On the left side of the flight master is a tower, that’s where you will find the ship. Borean Tundra should get you to level 76. If you need a change of scenery or run out of quests head to the first town in Dragonblight and the middle of Zul’drak, focus on the easy kill quests and return to Borean Tundra once you hit 76 to head into Sholazar Basin.

76-78

Sholazar Basin
Once you reach level 76, you should fly to Sholazar basin and stay there until at least level 78.

78-82

Icecrown and Storm Peaks
Once you get to level 78 you should fly to the Argent Tournament and level there until level 80. Most servers have issues with Hyjal so I would recommend leveling in Storms Peaks until level 81/82, the higher the better.

82-84

Mount Hyjal & (Uldum or Deepholm)
Once you hit level 82 make sure you pick up the quests from Valley of Strength in Orgrimmar. A giant Board gives out the quests. One quest will point you to Moonglade, complete that quest and then you will have a quest to head over to Mount Hyjal.
Make sure you take ALL of the quests in this area and try doing as many of the chain quests as possible. You should have enough to reach level 83 or 84.
If you only make it to 83 and a half then you’ll want to go head over to Uldum. You should still take the Board quests again from Valley of Strength. The map will not tell you where to go for the quests but you will need to head to Tol’vir, make sure you go pretty deep inside because it won’t show up instantly. You could also quest at Deepholm until level 84.

84-85

Twilight Highlands
At level 84 you’ll want to level in Twilight Highlands. There is a beginning quest in Orgrimmar, on some servers it’s bugged. If it’s bugged just use the portal and start the quest chains to begin leveling here.

Levels 85-90

Pandaria
When you’re 85 you’ll want to head to Pandaria, the portal is located in the Valley of Honor inside Orgrimmar.
At this point you just work your way across Pandaria doing the quest chains in each zone.
Jade Forest
Kun-Lai Summit
Townlong Steppes
Dread Wastes

-Credits to Blazemourne
Jade forest Singegruff OR Rivett Clutchpop(372 lvl 85)
Kun Lai The metal paw(393 lvl 87)
Townlong Steppes Alin the Finder(393 lvl87)
Townlong steppes Supplier Xin (408 lvl 88)

Credits to Potathoes for the zone level ranges mentioned in this guide.

post

MoP Alliance Leveling Guide

This MoP Alliance Leveling Guide is aimed at showing you where to level more-so than walking you through each quest.

Levels 1-10

You should complete your starter area quests and come out at level 10.

Levels 10-15

Westfall
This place is just a solid leveling zone once you reach level 10 and leave your respective starter area.

Levels 20-25

Duskwood
At this point you have two choices.
Dungeons are efficient but if you want to shake things up, you can go to Duskwood until level 25

Levels 25-35

Stonetalon Mountains
Personally I think Stonetalon Mountains are great at this point, fairly easy leveling and quests.

Levels 35-45

Cape of Stranglehorn
This is a solid place to level from 34 to 45..

Levels 45-50

Felwood
Easy quests, nothing too complicated.

Levels 50-52

Badlands
Nice change of scenery.

Levels 52-54

Burning Steppes
Travel through Redridge Mountains into Burning steppes through the north road.

Levels 54-58

Swamp of Sorrows
Enter from Burning Steppes

Levels 58-62

Blasted Lands

Levels 62-66

Zangarmarsh or Terokkar Forest, depending on your mood you can choose either of these!

Levels 66-68

Nagrand
You’ll need to stay here until level 68, make sure you do the Nagrand arena chain because it is really good experience, gold and a weapon at the end!

Levels 68-73

Howling Fjord/Borean Tundra
Either zone is solid, so it’s up to you.

Levels 73-76

Dragonblight
You should hit 76 here. If you get tired of questing in the same zone you have a bunch of options such as Grizzly hills. Don’t spend all day traveling though.

Levels 76-80

Sholazar Basin
Just a solid questing area, great for skinning or mining.
Icecrown is a great alternative for extra gold. I recommend going for Icecrown and doing the argent tournament quests.

Levels 80-81

Storm Peaks
Once you hit level 80, I recommend storm peaks for at least one more level. This will make your life in Mount Hyjal much easier.

Levels 81-83

Mount Hyjal
Can be a bit tough if you come here early but a great place to quest at the 81-83 level range.

Levels 83-84

Deepholm (With also a tip of Uldum)
If you’re going to try Uldum take the headstart quest and head over to the Tol’Vir City and fly over the entrance till you spot cages and quests.

Levels 84-85

Twilight Highlands
At level 84 you should continue to level in the Twilight Highlands, you may have to pick up a beginning quest in stormwind and then use the portal and start working on the quest chains.

Pandaria Levels 85-90

When you reach level 85 you want to go to Pandaria, the portal is located in Stormwind.
At this point you just work your way across Pandaria doing the quest chains in each zone.
Jade Forest
Kun-Lai Summit
Townlong Steppes
Dread Wastes

Extra Notes

Adventure Gear while Leveling – Credits to Blazemourne
Silkweaver rui 85 starting gear in jinyu vilage
The metal paw Kun-Lai Summit. (87)
Suplier xin Townlong Steppes. (88)
Weapons along the way while you level.
http://forum.warmane.com/showthread.php?t=277234

If you have a 90 Character, you may farm a rare spawn which drops this item.
http://www.wowhead.com/item=86574

Credits to Potathoes for the zone level ranges mentioned in this guide.

post

Naxxramas Boss Guide – Four Horsemen

The following is a Guide about the Four Horsemen who service Kel’Thuzad in Naxxramas. They were originally Highlord Alexandros Mograine, Thane Korth’azz, Lady Blaumeux, and Sir Zeliek.

This encounter is one of the hardest encounters Pre-Burning Crusade. The only bosses that could be considered harder are Gothik the Harvester and Kel’Thuzad.

Hunter damage cycles breakdown

BASIC THEORY

Using Aimed + Multi-Shot cycle
Multi-Shot is instant (close enough to the truth, very rarely delays Auto Shot with practice)
Disregarding mana, consumables negate mana issues
Disregarding haste buffs (Rapid Fire, Berserking, etc)
With 5/5 Improved Aspect of the Hawk, I add 4-5% damage, depending on weapon speed – Note: Working on better formula for iAotH

Every cycle consists roughly of:
1 Aimed Shot
1 Multi-Shot
x Auto Shot, depending on weapon speed and cycle lenght.

With most weapons, you’ll find something like the following happening:
Aimed Shot finishes cooldown. Auto Shot fired ~1 sec ago.
Should you clip your cycle (ignore the next Auto Shot and fire Aimed Shot immediately)? Or should you use a full cycle (wait for the Auto Shot before using Aimed Shot?
What would give the highest damage potential?

To answer this, you needed to compare both options, and see which one would yield the most damage.

THE AIMED SHOT CYCLE
Multi-Shot has the longest cooldown (10 sec), but since we stated Multi-Shot is an instant, the damage can be converted into any cycle lenght. For this reason, I’ll be using a default (clipped) cycle length of 9 seconds. While not being optimal for mana purposes, it is the one with the highest damage potential.
This is roughly what you’ll have to take into account:
If Multi-Shot does 1000 damage every 10 seconds, and the cycle is 5 seconds, the cycle damage for Multi-Shot becomes 500.
Likewise, if the cycle lenght is 20 seconds, the cycle damage would be 2000.

However, there are some things to keep in mind as well:
If the cycle is between 9 (minimum cycle length) and 10 seconds long, you have to include damage lost by conflicting cooldowns. For example, in a perfect 9 second cycle, you get to fire 6 Multi-Shots every 7 cycles. So, instead of using 9/10 of the Multi-Shot, I use 6/7 for this. As cycle lenght reaches 10, more of the Multi-Shot damage is included. So, don’t be alarmed if you’re not able to fire a Multi-Shot between each Aimed Shot.

The cooldown of Aimed Shot is 6 seconds, casting time is 3 seconds. During casting, Auto Shot cools down. This means that basically every weapon will get a free Auto Shot after Aimed Shot. The free Auto Shot comes after a delay of about 0.5 seconds after Aimed Shot is fired, regardless of weapon speed.
During the casting of Aimed Shot, no Auto Shots are fired.
Stats on weapons that affect damage (Agility, (Ranged) Attack Power, +crit%, +hit%) are taken into consideration for the rankings.

For the timestamps, I won’t include Multi-Shot. Every cycle basically has a “+ Multi-Shot”, which can be placed wherever it fits before Aimed Shot.

MISCONCEPTIONS
Cycles don’t exist
Arcane Shot and Aimed Shot have a linked cooldown. For raiding purposes, Aimed Shot is better than Arcane Shot in virtually every aspect. Although there are some exceptions, Aimed Shot is the best option for dealing ranged damage. Every time you use Aimed Shot, you’ve started a cycle. After Aimed Shot is completed, you have 6 seconds before Aimed Shot is ready again. Go clipped or full?

Cycles are impossible to use
They’re not. Performing them perfectly is practically impossible, and it’s harder with some weapons. However, getting as close as possible will be the most damaging thing you can do. Thus, the calculations I give you show the weapon with highest damage potential, and also how to deal the most damage with it. It’s up to you to maximize the potential. Practice, focus, and knowing the rhythm of your weapon helps a lot; you’re always able to improve. Additionally, a timer for your Auto Shots might help you a lot. Personally, I use ZHunterMod (http://curse-gaming….zhuntermod.html).
Clipped cycles are the easiest to use, since you can basically spam Aimed Shot and Multi-Shot, and the cooldowns will take care of the rest. Remember that latency might affect this a bit, making Aimed Shot ready just before Auto Shot fires (making you do a sub-optimal cycle). Spamming is rarely a good idea; paying attention is 😉

Lag and human reaction invalidate cycle calculations
Often you’ll hear people claiming cycles are useless because of reasons like lag, human reaction, etc. These settings vary from person to person; hunter A might have perfect conditions, performing at almost 100% of what he’s capable of, while hunter B might be experiencing lag, talking on the phone and feeding his parrot – of course he’ll perform worse. However, comparing the different weapons, using optimal conditions for everything is the fairest comparison. Although this has no influence on a weapon’s damage potential, if you know you suffer from lag or slow reaction times, take it into consideration when looking at what I write.

Look, Lactose, we’d rather you didn’t eradicate the whole human race.
– Sam & Max

Weapons and formulae

LIST OF WEAPONS
This is the current list of weapons I’ve compared:

Ancient Bone Bow
Ashjre’thul
Blastershot Launcher
Blessed Qiraji Musket
Bloodseeker
Bow of Taut Sinew
Bow of the Four Horsemen
Carapace Spine Crossbow
Core Marksman Rifle
Crossbow of Imminent Doom
Dragonbreath Hand Cannon
Fahrad’s Reloading Repeater
Flawless Arcanite Rifle
Grand Marshal’s Bullseye / High Warlord’s Recurve
Grand Marshal’s Hand Cannon / High Warlord’s Street Sweeper
Grand Marshal’s Repeater / High Warlord’s Crossbow
Gryphonwing Long Bow
Gurubashi Dwarf Destroyer
Heartstriker
Hoodoo Hunting Bow
Huhuran’s Stinger
Larvae of the Great Worm
Mandokir’s Sting
Nerubian Slavemaker
Rhok’delar
Silithid Husked Launcher
Stoneshatter
Striker’s Mark
Toxin Injector

Weapons will be listed sorted by damage potential; highest = first.
All values listed are vs bosses (level 63 mobs –> 8.6% missrate), and before armor mitigation.
This is how the information is going to be shown:

1 – The Milk Makerâ„¢, 2.0 speed
Best cycle DPS: 657, Clipped
Worst cycle DPS: 649, Full
Auto Shot DPS: 419 (1st)

Auto Shot DPS is included mostly for mana reasons. If two weapons seem very equal, but you know you run out of mana alot, you might want to choose the one with highest Auto Shot DPS, even though it could have a slightly lower best cycle. Auto Shot DPS is the DPS a weapon would have using only Auto Shot, not Aimed Shot or Multi-Shot. Auto Shot DPS might work as a tool for selecting a weapon for encounters where you feel you can’t use standard cycles.
(1st) indicates the ranking of Auto Shot DPS. If it’s the best Auto Shot DPS weapon, it’ll be (1st), second best would be(2nd), etc.

Note that using average cycle DPS is not a good idea for comparing weapons. For example, if you know the best cycle for The Milk Makerâ„¢ is clipped, you wouldn’t make half your cycles full; you would try to use the best cycle whenever possible.
A full cycle is, in most cases, slightly harder to perform than a clipped one, since you can’t just spam the button and let the cooldowns take care of the rest.

WEAPONS TO COME
Dwarven Hand Cannon
Polished Ironwood Crossbow

If you want any more weapons added, let me know, and I’ll see what I can do.

Alternatively, you can use your own gear / setup, and compare weapons, etc directly by using my spreadsheet:http://forums.elitis…pic.php?id=7312

FORMULAE USED
Auto Shot damage: SlayingMod*(AmmoDPS*WeaponSpeed+RWSMod*(RAP/14*WeaponSpeed+Scope+AverageWeaponDamage))
Aimed Shot damage: SlayingMod*(AmmoDPS*WeaponSpeed+RWSMod*(RAP/14*2.8+Scope+AverageWeaponDamage+AimedShotBonus))
Multi-Shot damage: BarrageMod*GSMod*SlayingMod*MSCoEff* (AmmoDPS*WeaponSpeed+RWSMod*(RAP/14*2.8+Scope+AverageWeaponDamage+MultiShotBonus))

CritDamage (all shots): HitDamage*(2+MortalShotsMod)*SlayingMod

Factoring in crits (all shots): HitChance*HitDamage + CritChance*Critdamage

AimedShotBonus = 600
MultiShotBonus = 150
MortalShotsMod = 0.30
SlayingMod = 1.03 if Slaying Talent, 1 if not
RWSMod = 1.05 if MM spec, 1 if LR spec
BarrageMod = 1.15 if MM spec, 1 if LR spec
GSMod = 1.15 if 8/8 Giantstalker bonus, 1 if not
MSCoEff: Coefficient for Multi-Shot.
Since the cooldown of Multi-Shot is 10 seconds, it’s obvious that using cycles between 9 and 10 seconds will make you lose a Multi-Shot now and again. For example, using a 9 second cycle, due to the conflicting cooldowns of Multi-Shot and Aimed Shot, you’ll be able to fire about 6 Multi-Shots every 7 cycles. So, for 9 second cycles, I add 6/7 of the Multi-Shot damage listed.
As the cycle lenght reaches 10 seconds, more of the Multi-Shot damage is used.
MSCoEff = ROUNDDOWN(6/(10-CycleTime)) / ROUNDDOWN(1+6/(10-CycleTime))) for cycles not exceeding 10 seconds, 1 for cycles exceeding 10 seconds.

CONTACT INFORMATION
Talnivarr EU – Horde — Lactose or Label
If there’s anything you want to comment, ask, etc, feel free to log on and send me a whisper. Please respect if I’m busy though =)
I also check this forum frequently, so posting here or sending a PM should work as well 😉

Tier 2+ MM-hunter

The following is aimed at a hunter with good equipment, roughly equivalent to full tier 2 or better.

SETUP
1500 RAP
23.5% ranged crit
+8% hit
5/5 Improved Aspect of the Hawk
3/3 Barrage
5/5 Mortal Shots
5/5 Ranged Weapon Specialization
3/3 Slaying vs Target
+7 scope
15% quiver
Thorium ammo (17.5 DPS)
Link to example gear setup: http://ctprofiles.net/3044976

WEAPONS RANKING
All values listed are vs bosses (level 63 mobs –> 8.6% missrate), and before armor mitigation.

1 – Nerubian Slavemaker, 3.2 speed
Best cycle DPS: 599, Full
Worst cycle DPS: 503, Clipped
Auto Shot DPS: 304 (1st)

2 – Ashjre’thul, 3.4 speed
Best cycle DPS: 571, Full
Worst cycle DPS: 491, Clipped
Auto Shot DPS: 283 (9th)

3 – Larvae of the Great Worm, 3.0 speed
Best cycle DPS: 558, Clipped
Worst cycle DPS: 530, Full
Auto Shot DPS: 290 (3rd)

4 – Soulstring, 2.9 speed
Best cycle DPS: 551, Clipped
Worst cycle DPS: 534, Full
Auto Shot DPS: 293 (2nd)

5 – Crossbow of Imminent Doom, 3.1 speed
Best cycle DPS: 547, Clipped
Worst cycle DPS: 507, Full
Auto Shot DPS: 276 (13th)

6 – Grand Marshal’s Hand Cannon & Repeater / High Warlord’s Street Sweeper & Crossbow, 2.9 speed
Best cycle DPS: 538, Clipped
Worst cycle DPS: 521, Full
Auto Shot DPS: 285 (8th)

7 – Rhok’delar, 2.9 speed
Best cycle DPS: 534, Clipped
Worst cycle DPS: 517, Full
Auto Shot DPS: 282 (10th)

8 – Fahrad’s Reloading Repeater, 3.2 speed
Best cycle DPS: 530, Full
Worst cycle DPS: 447, Clipped
Auto Shot DPS: 261 (22nd)

9 – Bloodseeker, 3.3 speed
Best cycle DPS: 528, Full
Worst cycle DPS: 451, Clipped
Auto Shot DPS: 259 (23th)

10 – Huhuran’s Stinger, 2.7 speed
Best cycle DPS: 525, Full
Worst cycle DPS: 517, Clipped
Auto Shot DPS: 286 (6th)

11 – Blessed Qiraji Musket, 2.6 speed
Best cycle DPS: 525, Full
Worst cycle DPS: 506, Clipped
Auto Shot DPS: 286 (6th)

12 – Carapace Spine Crossbow, 3.3 speed
Best cycle DPS: 523, Full
Worst cycle DPS: 447, Clipped
Auto Shot DPS: 257 (26th)

13 – Dragonbreath Hand Cannon, 2.8 speed
Best cycle DPS: 521, Clipped
Worst cycle DPS: 516, Full
Auto Shot DPS: 281 (11th)

14 – Heartstriker, 2.6 speed
Best cycle DPS: 516, Full
Worst cycle DPS: 498, Clipped
Auto Shot DPS: 280 (12th)

15 – Flawless Arcanite Rifle, 3.0 speed
Best cycle DPS: 510, Clipped
Worst cycle DPS: 482, Full
Auto Shot DPS: 233 (28th)

16 – Striker’s Mark, 2.5 speed
Best cycle DPS: 509, Full
Worst cycle DPS: 480, Clipped
Auto Shot DPS: 274 (14th)

17 – Gurubashi Dwarf Destroyer, 2.8 speed
Best cycle DPS: 508, Clipped
Worst cycle DPS: 503, Full
Auto Shot DPS: 272 (16th)

18 – Blastershot Launcher, 2.6 speed
Best cycle DPS: 508, Full
Worst cycle DPS: 491, Clipped
Auto Shot DPS: 274 (14th)

19 – Toxin Injector, 2.0 speed
Best cycle DPS: 503, Clipped
Worst cycle DPS: 498, Full
Auto Shot DPS: 290 (3rd)

20 – Core Marksman Rifle, 2.5 speed
Best cycle DPS: 503, Full
Worst cycle DPS: 474, Clipped
Auto Shot DPS: 270 (18th)

21 – Mandokir’s Sting, 2.6 speed
Best cycle DPS: 502, Full
Worst cycle DPS: 484, Clipped
Auto Shot DPS: 270 (18th)

22 – Hoodoo Hunting Bow, 2.8 speed
Best cycle DPS: 499, Clipped
Worst cycle DPS: 493, Full
Auto Shot DPS: 265 (20th)

23 – Stoneshatter, 2.9 speed
Best cycle DPS: 499, Clipped
Worst cycle DPS: 482, Full
Auto Shot DPS: 258 (25th)

24 – Silithid Husked Launcher, 2.8 speed
Best cycle DPS: 496, Clipped
Worst cycle DPS: 490, Full
Auto Shot DPS: 263 (21st)

25 – Bow of Taut Sinew, 2.2 speed
Best cycle DPS: 496, Full
Worst cycle DPS: 445, Clipped
Auto Shot DPS: 272 (16th)

26 – Grand Marshal’s Bullseye / High Warlord’s Recurve, 1.8 speed
Best cycle DPS: 494, Full
Worst cycle DPS: 470, Clipped
Auto Shot DPS: 287 (5th)

27 – Ancient Bone Bow, 2.8 speed
Best cycle DPS: 490, Clipped
Worst cycle DPS: 484, Full
Auto Shot DPS: 259 (23rd)

28 – Gryphonwing Longbow, 2.7 speed
Best cycle DPS: 477, Full
Worst cycle DPS: 473, Clipped
Auto Shot DPS: 254 (27th)

Tier 2+ LR-hunter

The following is aimed at a hunter with good equipment, roughly equivalent to full tier 2 or better.

SETUP
1550 RAP
28% ranged crit
+9% hit
5/5 Mortal Shots
5/5 Lightning Reflexes
3/3 Slaying vs Target
+7 scope
15% quiver
Thorium ammo (17.5 DPS)
Link to example gear setup: http://ctprofiles.net/3045139

WEAPONS RANKING
All values listed are vs bosses (level 63 mobs –> 8.6% missrate), and before armor mitigation.

1 – Nerubian Slavemaker, 3.2 speed
Best cycle DPS: 566, Full
Worst cycle DPS: 474, Clipped
Auto Shot DPS: 311 (1st)

2 – Ashjre’thul, 3.4 speed
Best cycle DPS: 539, Full
Worst cycle DPS: 463, Clipped
Auto Shot DPS: 291 (9th)

3 – Larvae of the Great Worm, 3.0 speed
Best cycle DPS: 528, Clipped
Worst cycle DPS: 501, Full
Auto Shot DPS: 298 (3rd)

4 – Soulstring, 2.9 speed
Best cycle DPS: 521, Clipped
Worst cycle DPS: 505, Full
Auto Shot DPS: 300 (2nd)

5 – Crossbow of Imminent Doom, 3.1 speed
Best cycle DPS: 516, Clipped
Worst cycle DPS: 478, Full
Auto Shot DPS: 283 (13th)

6 – Grand Marshal’s Hand Cannon & Repeater / High Warlord’s Street Sweeper & Crossbow, 2.9 speed
Best cycle DPS: 509, Clipped
Worst cycle DPS: 493, Full
Auto Shot DPS: 293 (8th)

7 – Rhok’delar, 2.9 speed
Best cycle DPS: 506, Clipped
Worst cycle DPS: 490, Full
Auto Shot DPS: 289 (10th)

8 – Bloodseeker, 3.3 speed
Best cycle DPS: 501, Full
Worst cycle DPS: 427, Clipped
Auto Shot DPS: 267 (23th)

9 – Huhuran’s Stinger, 2.7 speed
Best cycle DPS: 498, Full
Worst cycle DPS: 492, Clipped
Auto Shot DPS: 294 (6th)

10 – Blessed Qiraji Musket, 2.6 speed
Best cycle DPS: 497, Full
Worst cycle DPS: 480, Clipped
Auto Shot DPS: 294 (6th)

11 – Carapace Spine Crossbow, 3.3 speed
Best cycle DPS: 497, Full
Worst cycle DPS: 424, Clipped
Auto Shot DPS: 264 (26th)

12 – Fahrad’s Reloading Repeater, 3.2 speed
Best cycle DPS: 497, Full
Worst cycle DPS: 419, Clipped
Auto Shot DPS: 266 (22nd)

13 – Dragonbreath Hand Cannon, 2.8 speed
Best cycle DPS: 495, Clipped
Worst cycle DPS: 489, Full
Auto Shot DPS: 289 (11th)

14 – Heartstriker, 2.6 speed
Best cycle DPS: 489, Full
Worst cycle DPS: 472, Clipped
Auto Shot DPS: 288 (12th)

15 – Gurubashi Dwarf Destroyer, 2.8 speed
Best cycle DPS: 482, Clipped
Worst cycle DPS: 477, Full
Auto Shot DPS: 280 (16th)

16 – Blastershot Launcher, 2.6 speed
Best cycle DPS: 482, Full
Worst cycle DPS: 466, Clipped
Auto Shot DPS: 281 (14th)

17 – Striker’s Mark, 2.5 speed
Best cycle DPS: 481, Full
Worst cycle DPS: 454, Clipped
Auto Shot DPS: 280 (14th)

18 – Flawless Arcanite Rifle, 3.0 speed
Best cycle DPS: 480, Clipped
Worst cycle DPS: 453, Full
Auto Shot DPS: 264 (28th)

19 – Toxin Injector, 2.0 speed
Best cycle DPS: 478, Clipped
Worst cycle DPS: 473, Full
Auto Shot DPS: 298 (3rd)

20 – Mandokir’s Sting, 2.6 speed
Best cycle DPS: 476, Full
Worst cycle DPS: 461, Clipped
Auto Shot DPS: 278 (18th)

21 – Hoodoo Hunting Bow, 2.8 speed
Best cycle DPS: 474, Clipped
Worst cycle DPS: 468, Full
Auto Shot DPS: 273 (20th)

22 – Core Marksman Rifle, 2.5 speed
Best cycle DPS: 474, Full
Worst cycle DPS: 448, Clipped
Auto Shot DPS: 276 (18th)

23 – Stoneshatter, 2.9 speed
Best cycle DPS: 472, Clipped
Worst cycle DPS: 455, Full
Auto Shot DPS: 265 (25th)

24 – Silithid Husked Launcher, 2.8 speed
Best cycle DPS: 471, Clipped
Worst cycle DPS: 465, Full
Auto Shot DPS: 271 (21st)

25 – Bow of Taut Sinew, 2.2 speed
Best cycle DPS: 471, Full
Worst cycle DPS: 423, Clipped
Auto Shot DPS: 280 (16th)

26 – Grand Marshal’s Bullseye / High Warlord’s Recurve, 1.8 speed
Best cycle DPS: 469, Full
Worst cycle DPS: 448, Clipped
Auto Shot DPS: 294 (5th)

27 – Ancient Bone Bow, 2.8 speed
Best cycle DPS: 466, Clipped
Worst cycle DPS: 460, Full
Auto Shot DPS: 267 (23rd)

28 – Gryphonwing Longbow, 2.7 speed
Best cycle DPS: 454, Full
Worst cycle DPS: 450, Clipped
Auto Shot DPS: 262 (27th)

15% Cycle Timers

Speed: 1.5 (Reduced to 1.30 with quiver)
Clipped Full 0.50 Free Auto 0.50 Free Auto 1.80 Auto 1.80 Auto 3.11 Auto 3.11 Auto 4.41 Auto 4.41 Auto 5.72 Auto 5.72 Auto 6.00 Start Aimed 7.02 Auto 9.00 Aimed 7.02 Start Aimed 10.02 Aimed

Speed: 1.6 (Reduced to 1.39 with quiver)
Clipped Full 0.50 Free Auto 0.50 Free Auto 1.89 Auto 1.89 Auto 3.28 Auto 3.28 Auto 4.67 Auto 4.67 Auto 6.00 Start Aimed 6.07 Auto 9.00 Aimed 6.07 Start Aimed 9.07 Aimed

Speed: 1.7 (Reduced to 1.48 with quiver)
Clipped Full 0.50 Free Auto 0.50 Free Auto 1.98 Auto 1.98 Auto 3.46 Auto 3.46 Auto 4.93 Auto 4.93 Auto 6.00 Start Aimed 6.41 Auto 9.00 Aimed 6.41 Start Aimed 9.41 Aimed

Speed: 1.8 (Reduced to 1.57 with quiver)
Clipped Full 0.50 Free Auto 0.50 Free Auto 2.07 Auto 2.07 Auto 3.63 Auto 3.63 Auto 5.20 Auto 5.20 Auto 6.00 Start Aimed 6.76 Auto 9.00 Aimed 6.76 Start Aimed 9.76 Aimed

Speed: 1.9 (Reduced to 1.65 with quiver)
Clipped Full 0.50 Free Auto 0.50 Free Auto 2.15 Auto 2.15 Auto 3.80 Auto 3.80 Auto 5.46 Auto 5.46 Auto 6.00 Start Aimed 7.11 Auto 9.00 Aimed 7.11 Start Aimed 10.11 Aimed

Speed: 2.0 (Reduced to 1.74 with quiver)
Clipped Full 0.50 Free Auto 0.50 Free Auto 2.24 Auto 2.24 Auto 3.98 Auto 3.98 Auto 5.72 Auto 5.72 Auto 6.00 Start Aimed 7.46 Auto 9.00 Aimed 7.46 Start Aimed 10.46 Aimed

Speed: 2.1 (Reduced to 1.83 with quiver)
Clipped Full 0.50 Free Auto 0.50 Free Auto 2.33 Auto 2.33 Auto 4.15 Auto 4.15 Auto 5.98 Auto 5.98 Auto 6.00 Start Aimed 7.80 Auto 9.00 Aimed 7.80 Start Aimed 10.8 Aimed

Speed: 2.2 (Reduced to 1.91 with quiver)
Clipped Full 0.50 Free Auto 0.50 Free Auto 2.41 Auto 2.41 Auto 4.33 Auto 4.33 Auto 6.00 Start Aimed 6.24 Auto 9.00 Aimed 6.24 Start Aimed 9.24 Aimed

Speed: 2.3 (Reduced to 2.00 with quiver)
Clipped Full 0.50 Free Auto 0.50 Free Auto 2.50 Auto 2.50 Auto 4.50 Auto 4.50 Auto 6.00 Start Aimed 6.50 Auto 9.00 Aimed 6.50 Start Aimed 9.50 Aimed

Speed: 2.4 (Reduced to 2.09 with quiver)
Clipped Full 0.50 Free Auto 0.50 Free Auto 2.59 Auto 2.59 Auto 4.67 Auto 4.67 Auto 6.00 Start Aimed 6.76 Auto 9.00 Aimed 6.76 Start Aimed 9.76 Aimed

Speed: 2.5 (Reduced to 2.17 with quiver)
Clipped Full 0.50 Free Auto 0.50 Free Auto 2.67 Auto 2.67 Auto 4.85 Auto 4.85 Auto 6.00 Start Aimed 7.02 Auto 9.00 Aimed 7.02 Start Aimed 10.02 Aimed

Speed: 2.6 (Reduced to 2.26 with quiver)
Clipped Full 0.50 Free Auto 0.50 Free Auto 2.76 Auto 2.76 Auto 5.02 Auto 5.02 Auto 6.00 Start Aimed 7.28 Auto 9.00 Aimed 7.28 Start Aimed 10.28 Aimed

Speed: 2.7 (Reduced to 2.35 with quiver)
Clipped Full 0.50 Free Auto 0.50 Free Auto 2.85 Auto 2.85 Auto 5.20 Auto 5.20 Auto 6.00 Start Aimed 7.54 Auto 9.00 Aimed 7.54 Start Aimed 10.54 Aimed

Speed: 2.8 (Reduced to 2.43 with quiver)
Clipped Full 0.50 Free Auto 0.50 Free Auto 2.93 Auto 2.93 Auto 5.37 Auto 5.37 Auto 6.00 Start Aimed 7.80 Auto 9.00 Aimed 7.80 Start Aimed 10.8 Aimed

Speed: 2.9 (Reduced to 2.52 with quiver)
Clipped Full 0.50 Free Auto 0.50 Free Auto 3.02 Auto 3.02 Auto 5.54 Auto 5.54 Auto 6.00 Start Aimed 8.07 Auto 9.00 Aimed 8.07 Start Aimed 11.07 Aimed

Speed: 3.0 (Reduced to 2.61 with quiver)
Clipped Full 0.50 Free Auto 0.50 Free Auto 3.11 Auto 3.11 Auto 5.72 Auto 5.72 Auto 6.00 Start Aimed 8.33 Auto 9.00 Aimed 8.33 Start Aimed 11.33 Aimed

Speed: 3.1 (Reduced to 2.70 with quiver)
Clipped Full 0.50 Free Auto 0.50 Free Auto 3.20 Auto 3.20 Auto 5.89 Auto 5.89 Auto 6.00 Start Aimed 8.59 Auto 9.00 Aimed 8.59 Start Aimed 11.59 Aimed

Speed: 3.2 (Reduced to 2.78 with quiver)
Clipped Full 0.50 Free Auto 0.50 Free Auto 3.28 Auto 3.28 Auto 6.00 Start Aimed 6.07 Auto 9.00 Aimed 6.07 Start Aimed 9.07 Aimed

Speed: 3.3 (Reduced to 2.87 with quiver
Clipped Full 0.50 Free Auto 0.50 Free Auto 3.37 Auto 3.37Auto 6.00 Start Aimed 6.24Auto 9.00 Aimed 6.24Start Aimed 9.24Aimed

Speed: 3.4 (Reduced to 2.96 with quiver)
Clipped Full 0.50 Free Auto 0.50 Free Auto 3.46 Auto 3.46 Auto 6.00 Start Aimed 6.41 Auto 9.00 Aimed 6.41 Start Aimed 9.41 Aimed

Normalization

HUH, NORMALIZATION?
Quote from the patch-notes, regarding the normalization of melee weapon attacks. Bold emphasis my own:

The mechanics of most instant melee attacks have been modified to improve item balance. Previously, instant melee attacks did damage based on the damage range of the weapon, plus a bonus for the player’s attack power. This bonus was then multiplied by the speed of the weapon. As a result, slow weapons did more damage than was intended, and fast weapons were considered inferior by most players. We have changed the way the attack power bonus is calculated for instant attacks. This change does NOT affect attack power calculations for normal melee attacks. Instead of multiplying by the speed of the weapon, the attack power bonus is now multiplied by a fixed number pulled from the following table:
+ Two-handed weapons: 3.3
+ Daggers: 1.7
+ All other one-handed weapons: 2.4
As a direct result of this, many weapons have shifted position in their relative power. In particular, many Epic (purple) quality items are now more powerful than slower Superior (blue) weapons. This change was not made to reduce the power of instant attacks, but to correct the relative imbalance of weapon itemization. At a given level requirement, epic quality weapons should always be more powerful than superior quality weapons. Please also note that all normal weapon swings will be completely unaffected by this change. The following abilities are affected by the design change: Sinister Strike, Ambush, Backstab, Whirlwind, Mortal Strike, and Overpower.
For hunters, Multi-Shot and Aimed Shot now use 2.8 instead of weapon speed.

However, as we can see from the above posts, weapon speed is still too major an influence, with item quality and level being secondary; while it should be opposite. Bloodseeker (item level 63, rare quality) has a slightly higher damage potential than Huhuran’s Stinger (item level 78, epic quality).
Basically, I believe the normalization should have lead to [Epic with higher DPS] > [Rare with lower DPS], regardless of weapon speed. In addition, the following should also be true in most cases: [Epic with higher item level] > [Epic with lower item level]. However, I do think that weapon speed should have some influence, like it has for other classes.

I believe normalization in its current form failed.
With gear attainable at the moment, by varying weapon speed only, the total DPS output might change by almost 80 DPS. With a 50 DPS weapon, that’s about 1.6 times what the weapon’s raw DPS is. While this is with optimal cycle timing (meaning in real gameplay the difference most likely would be reduced slightly), the values are from a talent spec that isn’t the most optimal for raiding. It does not include 5/5 Improved Aspect of the Hawk; I’m not satisfied with my current formula for it.
Using the values from this post, Unahorn made a graph showing total DPS relative to weapon speed: http://media.wow-pra…ponSpeedDPS.jpg

To support my claim, I’ll use a fairly standard Marksman spec (let’s say 0/31/20), and show the damage potential a weapon would have, with DPS being constant, and weapon speed changing.
I use the stats of a tier 3 hunter, since this makes the problem. It’s important to remember the same principles also apply to lower tiered hunters. I am not considering Slaying talents, since they don’t work against all mobs, with very few mobs in Naxxramas (where the gear needed for this setup is collected) being valid targets.

While all this also due to some itemization flaws (adding fast weapons are, in a raid setting, mostly useless), I think that’s a seperate issue. Itemization was an issue before the normalization patch, the normalization should have taken current (and upcoming) weapons into account, allowing for future upgrades in better way than what we currently have. A big factor, I think, for implementing normalization, was a level 23 green weapon. Pre-normalization, it was, due to its 3.4 speed, better than most ranged weapons including Molten Core gear.
Post-normalization, this is no longer the case.
However, with better gear being added, and tier 2 becoming more accessible than ever before, we can yet again see the flaws of the ranged combat system.

Short summary of results:
Worst optimal cycle: 489.32 DPS (1.5 weapon, 1.30 quiver speed, full)
Best optimal cycle: 568.6 DPS (3.4 weapon, 2.96 quiver speed, full)
Difference: 79.28 DPS

Classic Hunter Guide

THE ARROW AND YOU

Here is a few guidelines/tips/tricks you can use in order to improve yourself as a Hunter in vanilla.
If you feel the need to chime in and cover some ground, of which I’m sure that I’ve missed, feel free to do so! I’m open-minded to all questions and suggestions regarding the guide and I will gladly hear them out.

Table Of Contents
1. Main Attributes & Stat Values
1.1 Main Attributes
1.2 Stat Values

2. BIS Gear & Enchants
2.1 Horde BIS List – Current Patch
2.2 Alliance BIS List – Current Patch

3. Consumables & Buffs
3.1 World Buffs
3.2 Damage Increasing Consumables & Buffs
3.3 Damage Increasing Pet Consumables & Buffs
3.4 Sustainability Consumables & Buffs
3.5 Situational Consumables & Buffs

4. Races & Racial Abilities
4.1 Racial Stats
4.2 Racial Abilities
4.3 Race Of Choice

5. Talent Builds
5.1 Recommended Talent Builds
5.2 Experimental Talent Builds

6. Pets & Pet Abilities
6.1 Pet Of Choice
6.2 Pet Abilities

7. Rotations & Cooldowns
7.1 Simplified Rotation
7.2 Explanation Of The Hunter Rotations
7.3 “Cycles Are Impossible To Use”
7.4 Lag And Human Reaction Invalidate Cycle Calculations
7.5 Aimed Shot Will Be Catching Up To Your Multi-Shot
7.6 Cooldown Management

8. Addons
9. Macros
10. Links & Downloads

_____ MAIN ATTRIBUTES & STAT VALUES ______

1.1 – Main Attributes
Agility
Increases attack power with melee weapons by 1 and ranged weapons by 2
Increases your crit chance by 0.0189% (1% crit per 52.91 Agility)
Increases Armor by 2 and Dodge by 0,0377% (1% dodge per 26.5 Agility)

Strength
Increases attack power with melee weapons by 1.

Stamina
Increases health points by 10 per point.

Intellect
Increases mana points by 15 per point and the rate at which weapon skills improve.

Spirit
Increases health & mana regeneration rates.

1.2 – Stat Values
The stat values below will differentiate depending on your current stats, talents and target defensive stats so because of that I’ve made 4 examples that you can use.
The examples are all specced as 20/31/00 and are fully buffed except for world buffs and shaman/paladin buffs. The gear can be viewed in the spreadsheet linked in the BIS section. The target is a lvl 63 dragonkin mob type with 5 sunder armor debuffs.

Patch 1.5 BIS (T1)
10 AP = 1.38 DPS
1 Crit = 3.72 DPS
1 Crit = 26.95 AP
1 AP = 0,0371% Crit

Patch 1.9 BIS (T2)
10 AP = 1.44 DPS
1 Crit = 4.58 DPS
1 Crit = 31.80 AP
1 AP = 0,0349% Crit

Patch 1.9 BIS (R13)
10 AP = 1.44 DPS
1 Crit = 4.67 DPS
1 Crit = 32.43 AP
1 AP = 0,0308% Crit

Patch 1.12 BIS (T3 + R12 Gloves)
10 AP = 1.37 DPS
1 Crit = 4.8 DPS
1 Crit = 35,03 AP
1 AP = 0,0285% Crit

I’ve used the hunter simulator spreadsheet linked in the “Links & Downloads” section to get these results, using the exact same method as Surelynotdhorn did

_________ BIS GEAR & ENCHANTS _________

This BIS list is based on Crestfall’s item progression which isn’t completely like retail vanilla, so because of that I’ve included some items to the earlier patches (Almost only pre 1.5) that other private servers tend to release before their original release date because most likely it’ll be the same for Crestfall (Not 100% confirmed yet, I will update whenever I know more).

These are the items which has been included for patches prior to their original release (The patches in parentheses are their original release date):

Epic PvP gear will not be considered because it’s extremely time consuming to get and not everyone have the time needed to be able to grind it however the post-rework PvP set is BIS until Naxxramas.
Link to the pre-rework PvP set
Link to the post-rework PvP set

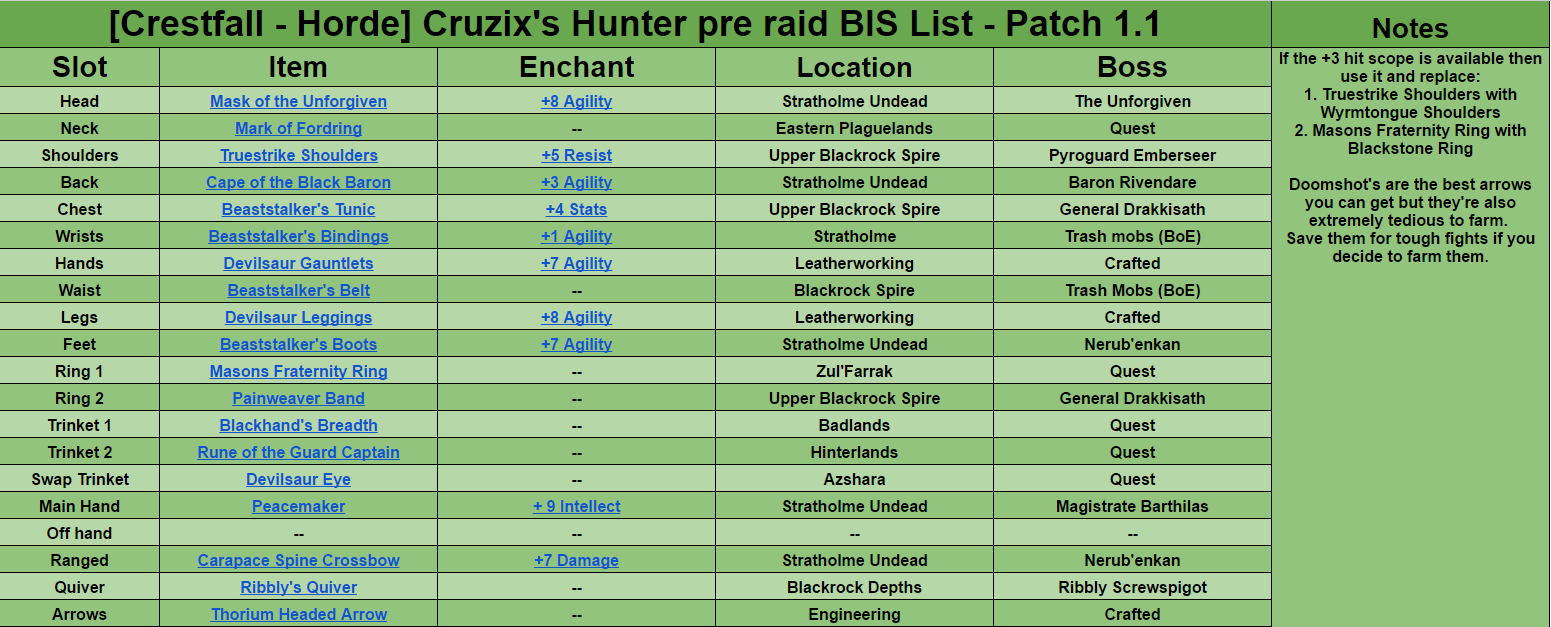
2.1 – Horde BIS List – Current Patchswhb3to.png
Link to Horde BIS list spreadsheet (Patch 1.1 – 1.12)

2.2 – Alliance BIS List – Current PatchqjQUEsJ.png
Link to Alliance BIS list spreadsheet (Patch 1.1 – 1.12)

_________ CONSUMABLES & BUFFS _________

Let’s face it, it’s not expensive to raid as a hunter since we have feign death to save our buffs if the raid wipes, so there’s no reason to go cheap on consumables.
Here’s all the consumables & buffs that are useful to hunters. (Class buffs not included)

3.1 – World Buffs

3.2 – Damage Increasing Consumables & Buffs

3.3 – Damage Increasing Pet Consumables & Buffs

  • Juju Might +40 AP – 10 min (Does not give RAP… cuz vanilla being vanilla)
  • Juju Power +30 Strength – 30 min
  • Juju Flurry +3% Attack Speed on friendly target20 sec (Puts Rapid Fire on a 30 sec CD if used on yourself)
  • Scroll of Agility IV +17 Agility – 30 min

3.4 – Sustainability Consumables & Buffs

3.5 – Situational Consumables & Buffs

_________ RACES & RACIAL ABILITIES _________

This section will be covering all relevant information about the races that can be played as a Hunter.

4.1 – Racial Stats
yyrBfBr.png

4.2 – Racial Abilities
Dwarf:

  • Stoneform: While active, grants immunity to Bleed, Poison, and Disease effects. In addition, Armor increased by 10%. Lasts 8 sec. 3 min cooldown.
  • Gun Specialization: Guns skill increased by 5.
  • Frost Resistance: Frost Resistance increased by 10.
  • Find Treasure: Allows the dwarf to sense nearby treasure, making it appear on the minimap.

Night Elf:

  • Shadowmeld: Activate to slip into the shadows, reducing the chance for enemies to detect your presence. Lasts until cancelled or upon moving.
    Night Elf Rogues and Druids with Shadowmeld are more difficult to detect while stealthed or prowling.
  • Quickness: Dodge chance increased by 1%.
  • Wisp Spirit: Transform into a wisp upon death, increasing speed by 50%.
  • Nature Resistance: Nature Resistance increased by 10.

Orc:

  • Blood Fury: Increases base melee attack power by 25% for 15 sec and reduces healing effects on you by 50% for 25 sec. 2 min cooldown.
  • Hardiness: Chance to resist Stun effects increased by an additional 25%.
  • Command: Damage done by Hunter and Warlock pets increased by 5%.
  • Axe Specialization: Skill with Axes and Two-Handed Axes increased by 5.

Tauren:

Troll:

  • Berserking: Increases your casting and attack speed by 10% to 25% (30% after patch 1.9). At full health the speed increase is 10% with a greater effect up to 25% if you are badly hurt when you activate Berserking. Lasts 10 sec. 3 min cooldown.
  • Regeneration: Health regeneration rate increased by 10%. 10% of total Health regeneration may continue during combat.
  • Beast Slaying: Damage dealt versus Beasts increased by 5%.
  • Throwing/Bow Specialization: Skill with Throwing/Bow Weapons increased by 5 (This will make you hit capped at 6 hit instead of 9 if you got a bow equipped)

4.3 – Race Of Choice
Horde PvE race ranking:

  1. Troll – Berserking is a great DPS increase especially when synergized with activate trinkets and other CD’s, Bow Specialization makes hit capped with 6 hit instead of 9. Regeneration and Beast Slaying are also decent racial abilities however they will be little of a use once you hit level 60. Trolls has the most base agility on the Horde faction.
  2. Orc – Command is a small DPS increase. Occasionally Hardiness will have it’s use in PvE as well. Orcs has the second most base agility on the Horde faction.
  3. Tauren – There’s no racial abilities that will benefit you in PvE when playing a tauren other than Endurance. Taurens has the lowest base agility on the Horde faction.

Horde PvP race ranking:

  1. Orc – Hardiness this talent alone makes orcs the best PvP race for Horde. Command is a small DPS increase. Orcs has the second most base agility on the Horde faction.
  2. Troll & Tauren – These races are tied because nor trolls or taurens have any significant racial abilities for PvP however trolls favors the offensive playstyle more because of the better DPS racial abilities and taurens favors the more “all around” playstyle since they have more health and a 2 sec stun with 0.5 sec cast time. Trolls has the most base agility on the Horde faction. Taurens has the lowest base agility on the Horde faction.

Alliance PvE race ranking:

  1. Night Elf – There isn’t really any of the racial abilities that night elves has which will benefit you in PvE, the only reason why night elves are better in PvE is because night elves has the most base agility on the Alliance faction.
  2. Dwarf – There isn’t really any of the racial abilities that dwarfs has which will benefit you in PvE. Gun Specialization isn’t good because even when considering it then there won’t be any gun that can become best in slot, Stoneform isn’t good either because there’s barely any boss mechanics where it’s useful. Dwarfs has the lowest base agility on the Alliance faction.

Alliance PvP race ranking:

  1. Dwarf – Stoneform is extremely good in PvP since it can be used to get rid of Blind, Crippling Poison, Viper Sting etc. as well as make you more tankier vs physical damage. Dwarfs has the lowest base agility on the Alliance faction.
  2. Night Elf – Shadowmeld is a really nice racial ability for when you’re defending bases in BG’s so you’re able to secure the opener on a enemy player that gets in range of you etc. it has a lot of other great uses and it’s a lot of fun to figure out ways to utilize this ability. Night elves has the most base agility on the Alliance faction.

_________ TALENT BUILDS _________

5.1 – Recommended Talent Builds
PvE:
1. http://db.vanillagaming.org/?talent#cZViohthtIbbV0h
Use this spec if you’re at 8 hit or below. You can swap talent points from Surefooted to Improved Aspect of the Hawk if you’re only missing 1-2% hit.

2. http://db.vanillagaming.org/?talent#ce0M0xxZViohtht
Use this spec if you’re at 9 hit or above

PvP:
For PvP it’s a bit of a personal preference, however these are the ones I can recommend
1. http://db.vanillagaming.org/?talent#cZgVohthtcbimoh

2. http://db.vanillagaming.org/?talent#cZtVohtZcbiik0ux
I highly recommend moving the points from Improved Wing Clip into Entrapment if you’re going to play premade BG’s as it will benefit you a lot more.

Leveling:
For leveling it’s bit of a personal preference, however this is the spec I can recommend
http://db.vanillagaming.org/?talent#ca0GztxRttVohx
I didn’t put points into Spirit Bond because this talent will give the hunter threat every time it heals so if your pet miss pulls a mob then the Hunter will get aggro whenever the talent heals.

5.2 – Experimental Talent Builds
PvE 00/21/30 vs 20/31/00 when above 500 agility:
On paper the 20/31/00 spec seems to be doing a lot better however in reality there will be some fights where you won’t be able to utilize your pets’ DPS properly as well as other situational stuff in which case the 00/21/30 spec could potentially be better even when considering the DPS Trueshot Aura provides for your group when using the 20/31/00 spec. I’m gonna have to test this once I get the gear requirements on Crestfall to be able to confirm anything.

Keep in mind that mentioning results from other servers will not prove anything since talent and ability formulas etc could’ve been completely different on the other server.

_________ PETS & PET ABILITIES _________

6.1 – Pet Of Choice
Short answer: Lupos for PvE, Broken Tooth for PvP.

PVE:
Lupos is the best PvE pet because it does Shadow Damage instead of Physical Damage, thus ignoring armor and will benefit from +Shadow Damage debuffs such as Curse of Shadows, Improved Shadow Bolt and Shadow Weaving.
After patch 1.9 you should instead be using Deathmaw if you want a wolf or Broken Tooth if you want a cat because Lupos will no longer be doing Shadow Damage after that patch.

Something you often will hear people say about Lupos is that “it will lower your raids DPS because it consumes Warlock’s Improved Shadow Bolt debuffs” however that is completely nonsense even if Lupos truly should be consuming ISB (I haven’t seen a single proof of Lupos consuming ISB in retail vanilla so please share if you have proof) due to various reasons:

  1. “Threat cap”
    Warlocks are able to do insane amounts of DPS however with insane amounts of DPS comes insane amounts of threat.
    This is something that Warlocks have no way of dealing with, instead they’re forced into stop DPS’ing so that the tanks can build a bigger threat lead.
    Hunters do not have this issue because we’re not able to do anywhere near as much DPS/threat as a Warlock and because we can Feign Death every 30 seconds to wipe our threat.
    Even if Warlocks didn’t utilize ISB at all they would still have threat issues if they go all in on DPS. So if they were to utilize ISB it would only make them “threat capped” faster, thus sharing ISB with Hunters will be far more effective for the raid.
    Not to mention that tanks occasionally will die/fail on boss mechanics or other situational events which will tighten the Warlocks threat cap even further.
    So in reality Warlocks wont be getting any additional DPS from ISB unless they’re fighting a boss where they can’t get aggro (Ragnaros, Ebonroc and Flamegore etc).
    This might only be legit for Horde Warlocks due to them not being able to benefit from Blessing of Salvation like Alliance Warlocks can. This is also the sole reason as to why Alliance Warlocks are doing so much more DPS on legacy-logs.com and realmplayers.com.
  2. Debuff overlapping
    If Hunters aren’t using Lupos then Warlocks and Shadow Priest’s Mind Blast will be the only classes who are able to utilize ISB, thus being much more likely to overlap ISB stacks and make them go to waste.
  3. ISB isn’t the only debuff which Lupos can utilize
    There’s 3 debuffs that Lupos can utilize; Improved Shadow Bolt, Curse of Shadow and Shadow Weaving so by using Lupos it will make all of these debuffs more effective. If Lupos is being fully buffed and it’s target has all of these debuffs then it is able to do 180-200 DPS on it’s own which is absolutely insane.

PVP:
Broken Tooth is the best PvP pet, and potentially the best PvE pet after patch 1.9.
The reason why Broken Tooth is the best PvP pet is because it’s the only cat that is able to do 1 attack per sec, which is the fastest you can get.
The fast attack speed is very useful in PvP as it makes it nearly impossible for casters to get a spell off because of the cast time push back from Broken Tooth’s melee attacks.
There’s only 2 other pets in the game which has similar attack speed and that is the ZG bat’s, however since they’re bats they cannot learn Prowl and Claw which both are great abilities in PvP and bats also does 4% less damage from auto attacks.

When Lupos no longer does Shadow Damage (post patch 1.9), then Broken Tooth can potentially be the superior pet to use in PvE depending on how good you are at pet micro managing.
Broken Tooth (Cats) do not have Furious Howl like Wolfs do which means you can no longer benefit from having your pet by your side just to buff you with Furious Howl, so you’ll need to be great at micro managing your pet and make sure it doesn’t die as well as not fuck up your own rotation.
If you’re not capable of that, then Broken Tooth will not be a DPS boost.

Leveling:
Use any cat for leveling, it doesn’t matter which one because they’re all be normalized, i.e. all pets of the same pet family does similar DPS regardless of attack speed (unless they’re buffed, which in that case fast attack speed pets does more DPS). Also make sure to tame a new cat every now and then so you can get new pet ability ranks.
Use the hunter pet beastiary linked in the “Informative Hunter Links” section to figure out which pets you should tame to get new pet ability ranks.

6.2 – Pet Abilities
PVE:
1. Teach your pet max rank Bite and Claw/Furious Howl.
2. Teach your pet max rank Great Stamina.
3. Teach your pet rank 3 resistance. Choose the resistance that would benefit you for the content you’re currently raiding.
4. Teach your pet rank 1 Dash (You do not need higher rank for raiding)
5. If done correctly you should now have 5 points left, use them on any rank 1 resistance you want or whatever else you can spend it on.

PVP:
1. Teach your pet max rank Bite, Claw and Prowl.
2. Teach your pet rank 9 Great Stamina.
3. Teach your pet rank 3 Frost Resistance.
4. Teach your pet rank 3 Dash.
5. Teach your pet rank 1 Nature Resist.

Leveling:
Assuming you’re using a Cat for leveling which I highly recommend, then this is the priority of which you should be teaching your pet it’s abilities.
1. Growl
2. Dash (Only need rank 1)
3. Claw
4. Bite
5. Greater Stamina/Natural Armor

_________ ROTATIONS & COOLDOWNS _________

7.1 – Simplified Rotation
Auto-shot->Aimed Shot->Auto-shot->Multi-Shot->Auto-shot->Repeat
See the pattern? Always use Aimed Shot immediately after you’ve fired an Auto-shot, weave Multi-Shot in between Auto-shots.

7.2 – Explanation Of The Hunter Rotations
There’s 2 rotations that you should know of. These are known as the “Clipped” and the “Full” rotation.

Every rotation cycle consists roughly of:
1 Aimed Shot
1 Multi-Shot
x Auto Shot

With most weapons, you’ll find that Aimed Shot finishes cooldown and Auto Shot fired ~1 sec ago. This makes you choose between:
A. (Clipped) Use Aimed Shot right when its cooldown is finished.
B. (Full) Delay Aimed Shot until after your next Auto Shot.

A. (Clipped) makes you lose an Auto Shot, but your cycle time is shorter than in B.
B. (Full) adds an Auto Shot, but extends your cycle time.

This is important because the cooldown of Aimed Shot is 6 seconds, casting time is 3 seconds. During casting, Auto Shot cools down.
This means that basically every weapon will get a free Auto Shot after Aimed Shot.
The free Auto Shot comes after a delay of about 0.5 seconds after Aimed Shot is fired, regardless of weapon speed.
During the casting of Aimed Shot, no Auto Shots can be fired.

This list will tell you what rotation you should use for all end game weapons, the list is also sorted from best to worst:
http://imgur.com/I1Mk8Xw

You can read a far more in depth explanation of clipped vs full rotation here and here

7.3 – “Cycles Are Impossible To Use”
They’re not. Performing them perfectly is practically impossible, and it’s harder with some weapons. However, getting as close as possible will be the most damaging thing you can do.
Thus, the calculations shows the weapon with highest damage potential, and also how to deal the most damage with it.
It’s up to you to maximize the potential. Practice, focus, and knowing the rhythm of your weapon helps a lot; you’re always able to improve.
Additionally, a timer for your Auto Shots will help you a lot. Personally, I use YAHT.

Clipped cycles are the easiest to use, since you can basically spam Aimed Shot and Multi-Shot, and the cooldowns will take care of the rest.
Remember that latency might affect this a bit, making Aimed Shot ready just before Auto Shot fires (making you do a sub-optimal cycle). Spamming is rarely a good idea; paying attention is.

7.4 – Lag And Human Reaction Invalidate Cycle Calculations
Often you’ll hear people claiming cycles are useless because of reasons like lag, human reaction, etc.
These settings vary from person to person; hunter A might have perfect conditions, performing at almost 100% of what he’s capable of, while hunter B might be experiencing lag, talking on the phone and feeding his parrot – of course he’ll perform worse. However, comparing the different weapons, using optimal conditions for everything is the fairest comparison.
Although this has no influence on a weapon’s damage potential, if you know you suffer from lag or slow reaction times, take it into consideration when looking at what I write.

7.5 – Aimed Shot Will Be Catching Up To Your Multi-Shot
Eventually your Aimed Shot will catch up to your Multi-Shot due to Aimed Shot having “9 sec CD” (6 CD + ~3 sec cast time) and Multi-Shot having a 10 sec CD.
When this happens then using Aimed Shot first will yield the most DPS, unless:
A. You’re able to consistently cleave on targets with Multi-Shot.
B. The targets you could’ve been cleaving on by casting Multi-Shot first would be dead by the time Multi-Shot is ready if you casted Aimed Shot first.

7.6 – Cooldown Management
Trinkets:
You should activate your swap trinket just as you start DPSing the boss and when the trinket effect wears off then you swap to your static trinket immediately.

Rapid Fire/Berserking:
Usually you want to use Rapid Fire/Berserking together with your trinket on your opener unless you need to save your cooldowns for a specific boss mechanic.
However using Rapid Fire/Berserking early has the added benefit of you being able to use them multiple times during an encounter depending on the fight duration.
Do not save Rapid Fire/Berserking for Aspect of the Hawk procs since there’s literally no reason in doing so when there’s only a 5% proc chance.
If you’re lucky to get a hawk proc while all your other cooldowns are active then make sure you watch your threat so you don’t over aggro.

_________ ADDONS _________

YAHT – Yet Another Hunter Timer
This addon gives you an auto shot timer which is crucial if you want to maximize your DPS. It also comes with a Tranquilizing Shot announcer which can be toggle on and off.

Highlights:
1. Aimed Shot & Multishot castbars for oCB, eCastingBar and default castbar that recognize all effects that modify castspeed
2. Tranquilizing Shot announcer
3. Highly customizable looks

Visual:
Qx8ZAxb.gif
The white bar is the “cooldown” time of your auto shot
The red bar is the draw time of your auto shot

AQYCf6X.png

Configuration: /yaht

Download Link: https://github.com/Aviana/YaHT

——

TrinketMenu (Fixed Version)
This addon lets you queue trinkets to auto swap for whenever you get out of combat (Feign Death) and is a must have addon if you want to maximize your DPS.

How to use TrinketMenu:
Have an activate trinket equipped at the start of an encounter, use it on your opener and then queue a static trinket by hovering TrinketMenu and choose a static trinket – after the activate trinket’s buff expires you feign death and the addon will auto equip the static trinket that you selected.

Visual:
C1xmEB2.png

Configuration: /trinketmenu options

Download Link: https://github.com/satan666/TrinketMenu-Fix

——

SHunterTimers
This addon makes it easier for you to track your trinket duration, debuff durations, procs, personal CC duration and boss frenzy timer it also makes your cast bar track aimed shot. Every feature can be enabled/disabled through the in game settings.

Visual:
GyrDwl7.png

Configuration: /sht menu

Download Link: http://addons.us.to/addon/shuntertimers

——

ClassicSnowFall
This addon accelerates key bindings so that they are activated by key press rather than key release. This allows you to activate your abilities faster than you could otherwise.

there’s no visual or in game configurations options for this addon.

Download Link: http://www.classicwow.com/forum/topic/13899-introducing-classic-snowfall/

——

Modified Power Auras
This addon is the vanilla version of “WeakAuras” which makes it possible to track every aura/ability/trinket in the game.

Examples of what to track:
Aspect of the Hawk procs
Rapid Fire duration
Trinket(s) duration
Important boss debuffs such as Baron Geddon’s Living Bomb, Vaelastrasz’s Burning Adrenaline.

Visual:
0CZScUt.pngC0CABTb.jpg

Configuration: /mpowa

Download Link: https://github.com/Geigerkind/ModifiedPowerAuras

——

SimpleFeignHealth
This addon makes it possible for you to see your health while you’re in feign death.

Configuration: /sfh

Download Link: http://addons.us.to/addon/simplefeignhealth

_________ MACROS _________

Auto Shot
This macro makes it so your auto shot no longer can be accidentally toggled off.

it WILL NOT WORK properly if this line doesn’t correspond with your Auto Shot hotkey: IsAutoRepeatAction(3)
If your Auto Shot ability is placed on hotkey 3, that means it should be (3) in the macro.
To figure out what hotkey your Auto Shot is on, refer to this image http://i.imgur.com/VGArn.jpg and change it accordingly within the macro.

/run if not IsAutoRepeatAction(3) then CastSpellByName("Auto Shot") end

——

Scatter Shot
This macro will prevent your pet from breaking Scatter Shot CC.
If you use the Scatter Shot macro on target A and your pet is attacking target B, your pet will continue to attack target B.
If you use the Scatter Shot macro on target A and your pet is attacking target A, your pet will go passive so it doesn’t break Scatter Shot CC.

/script if UnitExists("pettarget") and UnitIsUnit("target", "pettarget") then PetPassiveMode(); else end
/cast Scatter Shot

——

Frost, Immolation and Explosive Trap
This macro will prevent you from using feign death if you’re already out of combat but if you’re in combat it will feign death first and then trap if pressed twice.
Simply change the first line of the macro to whatever trap you want it for.

/cast Immolation Trap
/script if UnitAffectingCombat("player") then CastSpellByName("Feign Death") end

——

Freezing Trap
This macro will prevent you from using feign death if you’re already out of combat but if you’re in combat it will feign death first and then trap if pressed twice.

In addition to the other trap macro, this one will put your pet on passive to prevent breaking CC.

/cast Freezing Trap
/script if UnitAffectingCombat("player") then CastSpellByName("Feign Death") end
/script PetPassiveMode()

——

Revive/Mend Pet
This macro will use Revive Pet if your pet is dead and Mend Pet if your pet is alive.

/script if not UnitExists(“pet”) then CastSpellByName(“Revive Pet”); else if UnitIsDead(“pet”) then CastSpellByName(“Revive Pet”);else CastSpellByName(“Mend Pet”);end;end

——

Call/Dismiss Pet
This macro will use Call Pet if your pet is missing and Dismiss Pet if your pet is already called.

/script if PetCanBeAbandoned() then CastSpellByName(“Dismiss Pet”) else CastSpellByName(“Call Pet”);end

——

Melee Attacks
This is just a basic macro to lump all of your offensive melee skills onto one bind.

/cast Raptor Strike
/cast Counterattack
/cast Mongoose Bite

——

Wing Clip
This is a fall-through macro for Wing Clip. If you happen to be super low on mana for some reason and can’t use maximum rank Wing Clip, a lower rank will be used instead. Counterattack is a priority over all ranks of Wing Clip.

/run if 1==0 then CastSpellByName("Wing Clip");end
/cast Counterattack(Rank 1)
/cast Wing Clip
/cast Wing Clip(Rank 2)
/cast Wing Clip(Rank 1)

——

Hunter Tracking
This macro will use Track Beasts if you hold down CTRL and press the hotkey you bound it to, Track Humanoids if you hold down SHIFT + press hotkey and Track Hidden if no modifiers are held down when pressing the hotkey.

These are the only important tracking abilities that you should have bound, the rest you can leave in your spell book. Track Beasts is useful to track down Druid flag carriers in BGs, Track Humanoids to track down players, and Track Hidden to increase your stealth detection.

/script c=CastSpellByName if IsControlKeyDown() then c("Track Beasts"); else if IsShiftKeyDown() then c("Track Humanoids"); else c("Track Hidden");end;end

——

Nefarian Hunter Class Call
First of all, this macro will require you to have 2 ranged weapons, 1 equipped and 1 in bag slot 1.

All this macro does is to equip the ranged weapon which is in bag slot 1, this will be useful versus Nefarian because of the hunter class call mechanic that will break our current equipped weapon, however we have no way of knowing if its gonna be our class call or others.
So switching to a secondary ranged weapon before the class call timer hits will put us out of risk for our main weapon to break, meanwhile were still able to DPS.

/script SpellStopCasting()
/run local p,s="player",18 if GetInventoryItemLink(p,s)then PickupContainerItem(0,1)EquipCursorItem(s)end

——

One button Viper/Scorpid Sting
This macro will use Viper Sting if the target is a mana class, if its not then it’ll use Scorpid Sting instead.

/script if UnitPowerType(“target”)==0 then CastSpellByName(“Viper Sting”) else CastSpellByName(“Scorpid Sting”); end

_________ LINKS & DOWNLOADS _________

Horde BIS List Spreadsheet Patch 1.1 – 1.12 [LINK]

Alliance BIS List Spreadsheet Patch 1.1 – 1.12 [LINK]

Hunter Damage Cycles Breakdown 1.0 [LINK]

Hunter Damage Cycles Breakdown 2.0 [LINK]

TKA Something – A Hunter Site From Retail Vanilla [LINK]

Consumables List [LINK]

Hunter Pet Beastiary [LINK]

Hunter Simulator [DOWNLOAD]
You can upload the simulator to google sheets if you don’t have excel

Cataclysm Rogue Guide

Hello everyone!

For those, who know me – it’s been a long time, I didn’t fancy going Cata, but in the end I did and with it comes the hassle about specs, gear, gemming, reforging & etc. For those, who don’t know me – as my signature suggests, I am the author of the two Combat 3.3.5a guides – PvP and PvE – and I am still updating these when I find time.

Enough trivia, this is going to be the COMBAT PVE CATA Rogue Guide, covering everything you need to know, explained in a simple and understandable matter.

__—Updated for 4.3—__

This Guide will cover:
1. Talents & Glyphs
2. Stat weight, enchanting, gemming & reforging
3. Rotation & priority
4. Relevant Molten situation (bugs)
5. FAQs

A big credit is handed to ieatpaperbag from EJ team, whose Guide is the basis of mine (link at bottom)
A Changelog is posted at the bottom of the guide.

Abbreviations:
CP – Combo Point
SS – Sinister Strike
RvS – Revealing Strike
FoK – Fan of Knives
SnD – Slice and Dice
Evi – Eviscerate
Rup – Rupture
AR – Adrenaline Rush
BF – Blade Flurry
KS – Killing Spree
BG – Bandit’s Guile
RB – Restless Blades
MG – Main Gauche
TotT – Tricks of the Trade
IP – Instant Poison
DP – Deadly Poison
AoE – Area of Effect
Go# – Glyph of #

——————————————————————————————————————-

1. Talents & Glyphs

[7/31/3]
This is the basic Combat PvE spec. The points in Blade Twisting and Improved Sprint are simply a filler and a means to get to the bottom of the tree. Imp Sprint can prove particularly effective in some raid situations, where you are snared and need to run away quickly. Therefore you can put those 2 point in other talents, in example Improved Recuperate, which will increase your survivability a fair deal if you use it in a smart way (air phases or other times where you take a lot of damage, which you cannot prevent, and cannot DPS in the meantime).

The Glyphs that you should be using are:

Prime:
– Adrenaline Rush
Sinister Strike
Slice and Dice OR Revealing Strike

Major:
Blade Flurry
Tricks of the Trade
Feint

GoAR and GoSS are must-haves for Combat, there is no doubt about that. GoSnD is considered the best choice for your third Glyph, but you could as well get GoRvS, which will result in a total +45% increased effectiveness of your offensive finishers (Eviscerate & Rupture).

GoBF & GoTotT are must-haves. Both of these greatly increase your Energy effectiveness. So does the third glyph, which effectively removes the energy cost of Feint – an extremely useful ability in many raid encounters (remember Whiteout on Toravon and Bonestorm on Marrowgar), which will save you and your healers a lot of trouble.

None of the minor glyphs affects your performance in any way worthwhile. Choose whatever you like.

——————————————————————————————————————-

2. Stat weight, enchanting, gemming & reforging

Stat weight

First of all, you need to hit the two caps – Hit and Expertise. The hit cap is 2% or 241 hit rating for yellow attacks, which is as far as you need to get. The expertise cap is 23 or 691 expertise rating with racial bonus and 26 or 781 without racial bonus. As you will notice when you mouse over Exp, this will eliminate Dodge, but not Parry, because of the way boss mechanics work, so you should still aim to always be behind your target, capped or not. However, you should not gem or enchant for Hit or Expertise (only reforge), as they are not worth it. Agility has the highest priority!

After Hit and Expertise have been capped, the most important stats for you are Agility and Haste. Agility is by far the best stat you have and you need to have as much of it as possible – it adds attack power and crit. Haste increases your attack speed, which passively increases your Combat Potency and MG procs, and also directly increases your energy regeneration rate.

Your least valuable stats are Crit and Mastery, Crit being the weakest one. If you take a good look at the talents and the gameplay of Combat, it just doesn’t gain much from Crit. Mastery gives you a chance (16% base) for your MH attacks to cause you to do an extra MH attack, increased by 2% for every point of mastery you have (179.28 rating). MH attacks include both autoattacks and specials. The MG attack can proc Combat Potency. The MG attack can also proc poisons.

STAT WEIGHT: Agility>Hit(cap)>Expertise(cap)>Haste>Hit(excess from gear)>Mastery>Crit

Enchanting

Enchanting your gear is pretty straightforward and logical, so I am not going to go in-depth with that. You should enchant both of your weapons with Landslide or Hurricane in case you find Landslide too expensive.

Gemming

Basic:
Red
Yellow
Blue

In-depth:
Deriving from the stat weight for Combat, the gemming is self-explanatory. When looking at socket bonuses, you are looking after Agility. If the socket bonus is NOT Agility, gem +50 Agi no matter the socket colors, if it is Agility and the sockets are Red + Yellow – stick with the socket bonus, if it is Agility, but the sockets are Red + Blue (hit-capped) or Yellow + Blue, gem full +50 Agi. This will yield the maximum amount of useful stats you can have from your gear.

Reforging

Once you have reached the Hit & Expertise cap, you should aim to remove all your useless stats and gain as much from the useful ones as possible. You should reforge Crit and Mastery (and possibly extra Hit & Expertise) to Haste. If you have to choose between reforging Crit or Mastery, choose Crit – it is the weakest stat for you.

——————————————————————————————————————-

3. Rotation & Priority

Starting with Poisons, as a Combat Rogue, you should have IP on your slow MH and DP on your fast OH. For your Thrown, you should use Wound Poison. Explanation provided below in the Multi-target section.

Rotation

Single

Unlike Subtlety or Assassination, Combat doesn’t really care about opening, because it doesn’t have the temporary buffs the others have (Overkill, Master of Subtlety) and it does not need an initial opening setup. It makes very little difference for Combat if you start the fight with Garrote or just straight with SS. Your main goal as Combat is to keep SnD up at all times. Once SnD is up, you should just keep a 5-CP Rup on the target and use Evi as a filler. Use RvS in order to enhance your finishers’ DMG. Keep in mind that RvS generates one CP. RvS should be applied exactly at 4 CPs – no sooner and no later. If you are at 3 CPs, then use SS. If you get an extra CP from the glyph, simply use finisher. If you are at 5 CPs but without RvS up – screw RvS and use finisher regardless. The reasons are simple – SS>RVS in DMG and the amount of damage, Energy and CP lost is greater than the damage gain from an RvS + Evi/Rup. It is a bit hard to resist the urge to RvS + finisher, but you must get used to thinking about maximum damage output, not just big numbers. Your SnD doesn’t need to be 5-CP, it just needs to be up all the time – as long as it’s up, you have time for a damaging finisher and another SnD to refresh the old one, you are doing well. If for some reason you have RvS up and you have 4 CPs, use SS and not Shiv. Shiv does very low damage, because of your fast OH and is unable to crit, because of the mechanic of the skill.

Regarding Expose Armor – Fury and Prot Warrs, Assassination Rogues and Feral Druids will already apply the 12% armor debuff through glyphed Collosus Smash, Devastate, talented Expose Armor or Faerie Fire(Feral). If all those are absent in your raid, you should apply it after SnD. It is a personal loss of DPS for you, but a raid-wide increase depending on the raid composition.

Multi

For multiple targets, you should turn BF on and aim to position yourself in such a way so that you can strike your targets without putting yourself in danger. Prior to Cata, BF is now a self-aura with a 10sec cooldown instead of a timed active ability with a 2min cooldown. You can toggle BF off while the cooldown is still going. You should not use Rup while “cleaving” but Evi, because Rup does not affect other nearby targets, unlike Evi. As of Cata, BF no longer affects FoK. In addition, FoK does relatively low damage for Combat Rogues, even having in mind Ambidexterity, so in a multi-target situation you should not use FoK, except the targets are more than 7-8. The poison on your thrown weapon should be WP, because it takes around 30 seconds to make DP worthwhile. WP is better than IP, because WP’s proc chance is higher enough than IP’s to make it better in a short big-mob fight.

Bandit’s Guile
A lot of people misunderstand how BG works. BG has 3 levels of insight – Shallow, Moderate and Deep. Each of these provides a 10% bigger bonus in damage dealt to the target you are currently attacking (respectively 10, 20 and 30%). Insight is gained by executing any combination of four SSes or RvSes until you reach Deep Insight. Deep Insight cannot be refreshed and will fade after 15sec, which will begin the cycle anew. Switching to another target and striking it with SS/RvS will also reset BG, unless you use Redirect, which transfers not only the CPs but also the Insight. Keep in mind that Redirect’s cooldown IS affected by RB.

——————————————————————————————————————-

4. Relevant Molten situation (bugs)

Blade Flurry – Right now Blade Flurry does too low damage. The second target hit by BF is dealt lower damage than the main target by around 30-35%.

Killing Spree + FoK bug – While in KS, you will very often end up beind Energy capped (100 energy). Being Energy capped means that you’re doing something wrong and are losing potential DPS. While in KS, you are unable to use any kind of items or abilities, except FoK. However, this does not work on Molten.

Hit & Exp cap bug (General) – it is well known that the Molten hit & exp caps are lower than they should be. The exact amount however is still a matter of debate. So far it seems that 5% is enough hit for melee specials (down from 8%) and 16-17 Expertise is enough for melee attacks (down from 21). I have intentionally not adjusted the guide towards these bugs for several reasons – 1) they are somewhat unclear; 2) they are only valid for BOSSES, not trash mobs or boss adds; 3) they will get fixed eventually, since they’re affecting all classes.

Note: I have personally tested all of these bugs on Neltharion & Frostwolf and I confirm them!

——————————————————————————————————————-

5. FAQs

1. Why not use GoFoK?
As explained above, FoK does too low damage for Combat and is generally not used, thus also not glyphed.

2. When to use AR?
AR effectively doubles your Energy regeneration and also increases your attack speed by 20%, which combined with Combat Potency means an even higher energy regen. Very often during AR you will suffer energy-capping. Thus AR should not be used when your group has used BL/Hero/TW, since you will be energy-capped and will be effectively wasting energy. AR should be used in phases where the target is not moving and/or takes extra damage (pinned Magmaw, sun-phased Rajh) or when you have powerful procs up (Deep Insight, trinkets). You should never use KS while in AR, which is a total waste of energy. You should not use AR prior to executing a finishing move, because you will immediately become energy-capped, because of Relentless Strikes. The best way to use AR that I have found is after executing a finisher and spamming SS until I get low on energy (2-3 SSes). This way you will make use of RS’s energy spike and you will not waste energy from the GCD following the AR.

3. When to use KS?
KS is your highest burst ability. KS’s cooldown is affected by RB and can be glyphed for an additional 10% damage. Similarly to AR, you should try to use KS in phases where the target is not moving and/or takes extra damage or when you have powerful procs up (Deep Insight, trinkets). Since KS places you behind the target, you need to be very careful of your surrounding when using it – you could get heavily injured, die or even wipe the entire raid if you do not pay attention to specific boss mechanics. KS should be used when you are low on energy, because during it your energy will surely regenerate to full – Combat Potency can proc from KS. Also, I have found that because of the massive number of Eviscerates that you are executing during AR, it is best to use KS before AR. After AR, your KS will be already halfway off its cooldown.

4. Is Precision included in the Hit Rating tooltip on my character stat sheet [C]?
Yes, it is. This is why you only need 2% hit to reach the special attacks (yellow) cap. You can check it by simply looking at your hit rating while your character is naked – it will be 6% with 3/3 Precision.

5. Why should I use Hurricane over Avalanche, having in mind that MG procs can proc enchants?
Because Avalanche is a Procs-Per-Minute and not a Chance-On-Hit enchant.

6. What kind of weapons should I use? Axes, swords, maces, fists or daggers?
It doesn’t matter if you choose maces, fists, swords, axes or daggers, unless you have a racial bonus to one of these. The MH needs to be slow and the OH – fast.

7. When should I use RvS?
Revealing Strike should be used at 4 Combo Points – no sooner and no later. Using it sooner than 4 CP means you’re not using SS instead, which is a loss of DPS. Using it later than 4 CP means you’re wasting CPs, Energy and GCD for slightly bigger finisher damage, which is a loss of DPS.

——————————————————————————————————————-

This covers everything you need to know about Cata Combat Rogue PvE. If you have any suggestion or friendly feedback, I will be happy to receive them.

I will try to keep this thread up-to-date, stressing on the Bug & FAQ sections.

Changelog:
27AUG12 – Confirmed & changed RvS not affecting Rupture. Updated Wound Poison for FoK.
27AUG12 – Edited to Mastery>Haste. Credit to Soulsseeker (Rec). Added in FAQ.
29AUG12 – Edited talent link to mmo-champ with MoP live. Glyphs included.
29AUG12 – Added FAQ regarding Ruthlessness 1/3.
17SEP12 – Added Savage Combat bug. Updated bug status.
30OCT12 – RB + Rup bug fixed.
15JAN13 – Savage Combat bug fixed.
15JAN13 – Multiple FAQs added and updated. When to use RvS added and explained at the end of Single-target Rotation.
15JAN13 – Added Expose Armor in Single Target.
26JAN13 – RvS + Rup reported. Rup low dmg reported. Main Gauche (finally) reported. All bugs posted in section [4.]
04MAY13 – Major 4.3 update. Links fixed from wowhead to openwow. Updated Bug section, FAQ section & stats weights after Mastery fix.
16JUN13 – Updated Bug Section with links to the new reports. Hope they won’t get dismissed this time…
19JUN13 – Updated Bug Section after bug fixes and report dismissals.
21JUN13 – Updated Bug Section with a new RvS + Rup report and a DP report.
06OCT13 – Updated the talent build link. The new one is in German though, until the community finds / makes something available in English. Also, a lot of bug fixes.
28OCT13 – Replaced the German talent build link with an available English one. Thanks to MyRevolution.
16OCT14 – Updated Single-target Rotation section to better reflect the current state of Combat Rogues. Added #7 FAQ. Added explanation about hit & exp cap bugs on Molten in the Bug Section.
04DEC14 – Bandit’s Guile fixed after update. Also, changed gem links from wowhead to openwow.

Source: ieatpaperbag’s Combat Guide for Cata

I would also like to express my gratitude to all the Molten members (Rec, Ryu, misams, Griefel and more), who have supported me throughout the making and improvement of this guide.

Cataclysm Hunter Guide

Intro

I’m not good at these guides so don’t blame me / flame me, also if you’re here for just the talents / BiS gear then SHOO! away with you! I’m putting a lot of effort into these. Anyways, this guide is / will be based around the Marksman specialization for a hunter (a.k.a. MM hunter) focusing on the PvE aspect of the game.
Note: I’m sorry for any mistakes, bad English as I suck at English and I’ll never be good at anything that’s important in my life;_; (rip)

Hunters

Hunters are a Physical ranged DPS class capable of dishing out quite some DPS and especially the MM spec, which we will learn today, is welcome in lots of raids because of the AoE attack power buff from Trueshot Aura. Hunters mainly attack from a range and use bows, crossbows and guns as their ranged weapons although they can use melee weapons if an enemy gets too close.

Changes

Basically this will be a short section for people who have played WoTLK hunter (like myself) and are now playing on Cata. In cata a new resource was introduced for hunters – focus.
Focus – basically the same as energy (rogues, feral druids) but with a slower regeneration rate.
Arcane shot – our beloved arcane shot has no more 4 second cooldown *yay*
No more volley
And a lot of other changes i won’t go too in-depth now because they won’t really matter for the guide.

The basics – talents

So, a lot of players do the copy talents thing, i don’t like that. I know a lot of people will still do it but i’m going to post 2 trees here anyways.

The 7-31-3 talent tree

Takes 7 points in the beast mastery tree:

for pet focus rengeneration and stacking attack speed + additional damage from your aspect of the hawk

Takes 31 points in the marksmanship tree:

Efficiency 3/3 – Reduces focus costs of 3 of your abilities – Chimera shot (most importantly), Arcane shot (not bad as that’ll the your filler) and killing shot (not very useful but you’ll be using it from time to time so why not?)
Go for the throat 2/2 – generates focus for your pets (always useful)
Sic ‘Em! 2/2 – another focus talent for your pet (once again – useful!)
Improved steady shot 3/3 – increases your ranged attack speed and as you’ll be using steady shot a lot this talent is really good for any MM hunter
Careful aim 2/2 – i take this basically to get forward with the talent tiers this is not very useful as it only affects targets who are above 90% health but it’s a nice dps boost when you start your rotation on a raid boss.
Piercing shots 3/3 – MOAR DAMAGE!
Bombardment 2/2 – helps your focus when dealing with ads, thrash
Trueshot aura 1/1 – the talent that every physical dps will love you for. More damage for the whole raid, including yourself!
Termination 2/2 – more focus regeneration from steady shot, though it’s only after the boss is below 25% health
Rapid recuperation 2/2 – Useful talent on bosses as you’ll be using rapid fire a lot. You can never have enough focus regen.
Master marksman 3/3 – The best passive MM talent, in my opinion, as it gives you a free aimed shot without a cast time from time to time greatly increasing your DPS.
Readiness 1/1 – it’s basically to reset your rapid fire, you want to use this as soon as you hit your rapid fire button
Posthaste 2/2 – reduces the CD of rapid fire by 2 min – great talent as you want your rapid fire up for every boss
Marked for death 2/2 – 2nd Hunter’s mark ftw. a.k.a. more DPS.
Chimera shot 1/1 – One of your most important ability as an MM hunter, resets your serpent sting on the target and does a lot of damage without a cast time.

Takes 3 points in the survival tree:
for increased ranged haste

The 2nd talent tree:

5-31-5

5 in beast mastery basically for the same purpose as in the first talent tree minus the attack speed for your pets
31 in marksman basically for the same reasons as the first talent tree (there are no differences)
5 in survival for:
Pathing 3/3 – increases your ranged haste (same as in the other tree)
Improved serpent sting 2/2 – does 30% of the DoT damage instantly (more burst) and has a 10% increased chance to crit.
Note: from my expirience whenever you cast chimera shot to refresh the serpent sting effect it won’t trigger the 30% instant damage, it only triggers if you use serpent sting.

Conclusion: right now i run with the 2nd tree as i have a slight dps increase when i use this one.
Note: These talent trees are here to give you an example on what talents you should consider (that’s why all the explainations below the images) and you should consider editing these talents to your playstyle / needs.

Rotations

As much as i like the word “rotation” you won’t get that with this class. I will try to give you something similar to a rotation for this guide. Also before you skip this section because this looks like a total mess – read through it a few times and try it yourself on a training dummy you’ll realize it’s not as messy as it looks.

Single target rotation:

a)you want to pop all your cd’s (rapid fire + readiness) and any potions or other stuff you might have
b)Serpent sting
c)chimera shot
d)1 steady shot
e)2 arcane shots
f)steady shots until your chimera shot is off CD or you have 5 master marksman procs
If:
your chimera shot is off CD
a)you use chimera shot to reset the cooldown of serpent sting
b)1 Steady shot
c)2 Arcane shots
d)Steady shots until your chimer shot is off CD or you have 5 master marksman procs
If:
you have 5 master marksman procs
a)you use aimed shot
b)use chimera shot (it should be off cd by that time, if it’s not then spam steady shots until it is)
c)arcane shots until you can’t cast them anymore (below 22 focus)
d)spam steady shots until chimera shot is off CD
e)chimera shot
f)1 steady shot
g)2 arcane shots
h)steady shot until you have 5 master marksman procs or your chimera shot is off CD
When:
When your rapid fire runs out you should refresh instantly because if you used readiness your rapid fire should be off cooldown instantly.

Multi-target:

Spam dat multi-shot (dps on thrash is not that important)

That’s the basic hunter rotation. You can adjust this to your playstyle / needs once you’ve learned the basics.

BiS (best in slot / best gear

I suck at linking things and doing all that fun stuff so i’ll just add the names and you’ll have to search for the gear yourself, SORRY!

  • Head: Wyrmstalker’s headguard
  • Neck: Choker of the vanquished lord
  • Shoulders: Wyrmstalker’s spaulders
  • Back: Dreadfire drape
  • Chest: Wyrmstalker’s Tunic
  • Wrist: Bracers of looming darkness
  • Hands: Sporebeard gauntlets
  • Waist: Belt of the belowed companion
  • Legs: Wyrmstalker’s legguards
  • Feet: Treads of dormant dreams
  • Ring 1: Seal of primordial Shadow
  • Ring 2: Signet of grasping mouths
  • Trinket 1: Vial of shadows
  • Trinket 2: Wrath of unchaining
  • Main Hand: Kiril, fury of beasts
  • Ranged: Vishanka, jaws of the earth

Gemming / enchanting

Gems:

Meta: 1x Agile shadowspirit diamond
Red: 19x Glinting shadow spinel 1x Delicate Queen’s garnet
Yellow: 1x Deadly lava coral
Prismatic: Glinting Shadow spinel (i added the prismatic ones to the red so you shouldn’t buy more then 19 Glinting shadow spinel’s)

These are my gems and the exact number of gems i use in my current gear (look at the BiS list) If you need a general idea of what gems to use or you don’t have BiS then:
Red:
a)if hit cap: Delicate Queen’s garnet
b)if not hit capped: Glinting shadow spinel
Blue:
a)Delicate Queen’s garnet
Yellow:
a)Deadly lava coral

Enchants

  • Head: Arcanum of the Ramkahen
  • Shoulders: Greater Inscription of Shattered Crystal
  • Back: Enchant Cloak – Major Agility
  • Chest: Enchant Chest – Peerless Stats
  • Wrists: Enchant Bracer – Agility
  • Hands: Enchant Gloves – Major Agility
  • Waist: Ebonsteel Belt Buckle
  • Legs: Dragonscale Leg Armor
  • Feet: Enchant Boots – Assassin’s Step
  • Rings: Enchant Ring – Agility (if you have enchanting)
  • Main hand: Enchant 2H Weapon – Mighty Agility
  • Ranged: Flintlocke’s Woodchucker

Stats priority

  1. 1.Hit rating until you reach 8% hit cap
  2. 2.Agility
  3. 3.Critical Strike Rating
  4. 4.Haste Rating
  5. 5.Mastery Rating

Pets

I use a raptor. You can use any pet but i suggest you look for a pet that has the ferocity talent tree.
Ferocity talents:

Macros

I use a few macros which are used by most hunters usually as i feel like there’s no need for any specific macros for MM.

The macros:

1.Rapid fire + Call of the Wild (RF + CotW)

#showtooltip Rapid Fire
/cast Rapid Fire
/cast Call of the Wild

Use this only if you have a pet with Call of the Wild

Deterrance

#showtooltip Deterrence
/cast Deterrence
/cancelaura Deterrence

Misdirection

#showtooltip Misdirection
/cast [target=mouseover,help,nodead][target=focus,help,nodead][]Misdirection

It’ll cast misdirection on the target you are currently mousing over

That’s it.

Addons

There’s literally only 1 addon i use specifically for MM

-Serenity ( http://www.wowinterface.com/downloads/info20019-Serenity.html#info )
It provides you with an easy to see focus bad as well as ability cooldowns.

The hunter and the Hunted:

The difference between a mlg hunter and a mediocre hunter are:
-the timing of chimera shot. As you should know by now chimera shot refreshes the cooldown on serpent sting so a good hunter won’t just spam it whenever it comes off cooldown but he will use it to refresh the DoT on serpent sting on the very last moment.
-Focus management. Focus is an endless resource (means you’ll never need to refresh it like mana provided you don’t have 999999999 mana regen) but that doesn’t mean you can’t run out of it mid-fight and mess up your whole rotation. So generally you should pay close attention to your focus bar (that’s what serenity addon is there for) and make sure you don’t run below 40 Focus when your main abilities are about to come off cooldown. The reason i included do x many arcane shots in the rotation is so you don’t spam 50 arcane shots after every steady shot messing up your rotation completely. In the best case you shouldn’t use arcane shot at all when any of your main ability cd’s is below 5 sec. Another thing is overcapping your focus (having 100 focus) having 100 focus is bad because:
a) you are not regening focus (losing out on potentional vaule)
b) you are missing out on extra DPS as you could have used that focus for casting arcane shots
Your focus should be from 20-80 at all times (except when out of combat)
-20 after a full rotation (all your main abilities just went on cd)
-80 when your main abilities are coming up (around 3 sec cd left)

Glyphs

  • 1.Prime:
  • -Glyph of Arcane Shot
  • -Glyph of Rapid Fire
  • -Glyph of Steady Shot
  • 2.Major:
  • -Glyph of Disengage
  • -Glyph of Mending
  • -Glyph of Trap Launcher
  • 3.Minor:
  • -Glyph of Feign Death
  • -Glyph of Lesser Proportion
  • -Glyph of Revive Pet

Note: important glyphs are: Glyph of Arcane Shot, Glyph of Rapid Fire, Glyph of Steady Shot, Glyph of Mending. Any other glyphs can be changed/adjusted to your playstyle

The end

So, that’s about it. If you feel like i missed anything important or i should add something, you disagree with something, want to discuss about something – feel free to comment below as i’ll be happy to respond to your questions / suggestions.

Cataclysm Mage Guide – Inferno

Talents

I would recommend using the following build:

http://www.wowhead.com/talent#o0hZfchrkbRRsfoc

Talents I would consider optional are:

Master of Elements [2/2] – Your spell criticals will refund 30% of their base mana cost.
Over a long fight, this talent will give you a nice chunk of your mana back. That being said, if you think you won’t run low on mana and plan on using Fire Blast, you can drop this talent for Improved Fire Blast instead.

Cauterize [2/2] – In short, this is like a personal battle res.
Although, I don’t recommend dropping this talent, you could drop it for a different one if you really wanted to. Just keep in mind two things, it can save the use of a battle res and a dead dps is a useless dps.

Improved Scorch [2/2] – Reduces the mana cost of your Scorch spell by 100%.
Very nice for high movement fights. If you are moving and don’t need to refresh Living Bomb or dont have a Hotstreak proc to use or a Flame Orb/Mirror Images, you’re going to be spamming Scorch. Without this talent, Scorch can drain your mana pretty fast. That being said, if you don’t think you will be moving that much or think your mana can last without it, you can drop it for something else.

The rest of the talents I consider mandatory for maximizing dps.

Glyphs

Prime

Glyph of Fireball – Best

Glyph of Pyroblast – Best

Glyph of Molten Armor – Best

Major

Glyph of Blink – I recommend this for raiding. Gives you more distance on your blink to escape deadly boss mechanics you might get caught up in.

Glyph of Evocation – I also recommend this for raiding because it allows you to heal a bit of damage and even evocate to heal through a Cauterize for increased survivability.
??? – I’ll leave this one to you.

Minor

Glyph of Mirror Image – Mirror Images will cast Fireball instead of Frost Bolt. Why not?

Glyph of Slow Fall – Removes the reagent requirement from Slowfall. Take this unless you want to go around with light feathers in your bags.

Glyph of Arcane Brilliance or Glyph of Conjuring – Brilliance is good because it saves you mana if you have to spot buff someone who was just battle ressed. Really up to you.

Stats & Reforging

Intellect – Intellect is by far your best stat, no amount is too much. Intellect gives you mana, spell crit, and spell power.

Hit – Reduces the chance you will miss your target. We don’t want any of our spells missing. You want to get as close to your hit cap as possible without being under, if possible. It’s better to be slightly over the hit cap than slightly under.

Hit cap for Draenei is 1639 Hit rating because Draenei have 1% hit from their racial.

If not a Draenei your Hit cap is 1742 Hit rating or 17% hit.

If not yet geared enough for raiding and still running dungeons, you want a total of 6% hit to never miss in dungeons.

Haste – Increases spell casting speed. Also affects some of your dots, giving some dots an extra tick at certain haste points.

Haste points to know:
Extra tick on Living bomb & Pyroblast(dot) – 12.5% (+1 tick), 37.5% (+2 ticks)
Extra tick on Combustion(dot) – 5% (+1 tick), 15% (+2 ticks), 25% (+3 ticks), 35% (+4 ticks)

Crit – Increases the chance your spells have to crit. As a Fire Mage we want our spells critting a lot =). Definetally the best stat after Intellect and Hit cap.

Mastery [Flashburn] – Increases the damage done by all your periodic fire damage effects. Each point of mastery increases periodic damage done by an additional 2.8%.

There are two basic stat priorities you should go by when reforging:

Without t13 Time Lord’s Robes 2 set bonus:

Intellect>Hit to cap>Crit>Haste>Mastery

If you can get to 1181 Haste without losing too much crit, go for it. This will bring you to 12.5% haste self buffed, giving you an extra tick on Living Bomb and Pyroblast(dot).

With t13 Time Lord’s Robes 2 set bonus:

Intellect>Hit to cap>1505 haste>Crit>Haste>Mastery

When you are raid buffed(+5% haste) and have Stolen Time stacked up to 10, this will bring you to the 25% haste needed for the third tick on Combustion.

Gemming & Enchanting

Gems you should be using are:

Meta socket: Burning Shadowspirit Diamond

Red socket: Brilliant Inferno Ruby

Blue socket: Veiled Demonseye

Yellow socket: Reckless Ember Topaz or Potent Ember Topaz

When do you gem for the socket bonus? If the socket bonus is 20 Intellect or more, go for the socket bonus. If the socket bonus is 30 of another stat, go for the socket bonus. Otherwise, ignore the socket bonus and gem pure Intellect.

As a fire mage you will want to be using Potent Ember Topaz instead of Reckless Ember Topaz to match yellow sockets, unless you need the haste to reach a breakpoint. Of course, you can use the Epic equivalents if you have the gold.

Enchanting:

Helm: Arcanum of Hyjal – Requires you to be Revered with the Guardians of Hyjal. Vendor located in Mount Hyjal.

Shoulders: Greater Inscription of Charged Lodestone – Requires you to be Exalted with the Therazane. Vendor located in Deepholm. Best shoulder enchant unless you have Inscription.

Cape: Enchant Cloak – Greater Intellect – Best cape enchant unless you have Tailoring.

Chest: Enchant Chest – Peerless Stats – The best chest enchant for pve.

Enchant Chest – Mighty Stats – For the sake of 5 stats, a cheaper alternative.

Bracers: Enchant Bracer – Mighty Intellect – The best, but it’s expensive.

Gloves: Enchant Gloves – Haste – Although 65 mastery is the better enchant, you can choose this one if it’s the only way to reach a haste breakpoint.

Enchant Gloves – Greater Mastery – The best glove enchant available for pve.

Belt: Ebonsteel Belt Buckle – Technically not an enchant, but you should put that extra socket on your belt.

Legs: Powerful Enchanted Spellthread – The best pve enchant for legs. If you are a Tailor, you can pretty much get this for free.

Feet: Enchant Boots – Lavawalker – Commonly considered the best enchant for pve because of the movement speed increase.

Enchant Boots – Precision – A good choice if your having trouble getting to your hit cap.

Enchant Boots – Haste – The best choice if you don’t care for the movement speed increase on lavawalker and are at your hit cap.

Enchant Boots – Mastery – Almost as good as the haste enchant. Personal preference.

Weapon: Enchant Weapon – Power Torrent – The best weapon enchant by far.

Off-hand: Enchant Off-Hand – Superior Intellect – If you have an off-hand, toss this enchant on it.

Professions

I would recommend getting Tailoring as one of your professions. Mainly because of the cheap leg enchant and you get a nice cape enchant. You also get to make bags and armor you can use etc.

Enchanting is a nice profession to pair with Tailoring, but if you are looking for the best, I would probably go with Blacksmithing (the two extra sockets when paired with the epic gems add up to +100 int, thats +20 more than most other professions) or Engineering which has lots of useful items and a nice on-use glove enchant that you can use whenever you like, on a 1 minute cooldown (you can also have a regular enchant on your gloves in addition to this one).

If you really don’t care for the minimal dps difference in professions, just choose what you like or what you think will make/save more money.

Rotations

More of a spell priority list, but anywho. In order of most important to the least important.

Single Target:

1. Combustion When your dots are lined up. (more on this later)

2. Pyroblast – Hot streak proc.

3. Flame Orb – When off cooldown.

4. Living Bomb – Let it explode/expire before you re-apply.

5. Scorch – Only if there is no crit debuff on the target (to apply critical mass).

6. Fireball – Your main spam/filler ability if not moving.

7. Scorch – Only while moving.Remember, if you are moving you don’t need to go straight to scorch spamming. Still go by the priority list. If you have a Hot Streak proc, use it. There is also Flame Orb, Living Bomb and Mirror Images which have a higher damage per execute than scorch.

Multiple Targets:

There are a couple of ways to do aoe as a fire mage. Normally, you want to just follow your single target rotation and use Blast Wave to fish for impact procs and spread your dots. You can spread your Living Bomb with impact, which is a more mana efficient way to aoe, or you can manually put Living bomb on up to 3 targets, which will increase your haste by 10% while all three of them are still up. You don’t want to manually put up Living Bomb on 3 targets unless you know for sure they will last the full duration, letting them all explode for some nice damage.

The most effective way to aoe is to get a good Combustion up on a target and spread it with impact. Although it’s highly dependant on rng that you will get the chance to do this (depending on gear), it is a very good thing to aim for. Impact will not only spread the full Combustion to all targets in range, but it will also spread any existing Ignite, Pyroblast(dot) and Living Bomb(only up to 3 targets though) as well.

Impact can sometimes be a pain, getting it when you don’t need it, and not getting it when you do. Blast Wave is by far the best way to fish for an impact proc, but it’s not the only way. If Blast Wave is on cooldown, and you are in melee range, use Dragon’s Breath. Then, if you still dont have one you can continue with your single target rotation or try your luck with a Flamestrike.

Additional Info

Getting a good Combustion:

How exactly does Combustion work? It takes a snapshot of all of your fire dots on your target and combines them into one massive dot. This doesn’t remove the old dots, it simply creates a new one. Remember that Combustion is off of the gcd (global cooldown).

Getting a good Combustion is key to maximizing your dps. Always make sure you have an Ignite, Living Bomb and Pyroblast(dot) on your target before you use combustion. That being said, the main dot that affects the damage of your Combustion the most is your Ignite. Stacking your ignite before using combustion greatly improves combustions damage.

When trying to line up a Combustion, one trick is to refresh Living Bomb just after you cast Pyroblast via Hot Streak(instant cast). If that Pyroblast crits, you already have Living Bomb refreshed and you are ready to hit your Combustion. Another tip is to hit Combustion before your Ignite ticks, because every time the Ignite ticks, its total damage is reduced thus reducing the amount added to Combustion.

Practice with Combustion and learn to use it effectively.

Ignite:

Ignite is applied when you critically hit with a non periodic fire damage spell. 40% of the damage done by the crit is turned into an Ignite. So, if you crit for 100k, you put a 40k ignite on your target for 4s (4s is the initial duration). Ignite ticks every 2 seconds meaning a 40k ignite would tick for 20k damage after 2 seconds, and another 20k after it expires.

If you get lucky and crit with another spell that applies Ignite while the first Ignite is still up, those Ignites are combined into a stronger one. Due to “Ignite Munching” sometimes this glitches and you don’t always get the stacked Ignite that you would expect. If you stack an Ignite, the new one, and every stacked Ignite after will have a 6 second duration but still tick every 2 seconds(the first tick of a stacked Ignite usually goes off as soon as it is refreshed). A well stacked Ignite can lead to a very powerful Combustion.

For more detailed information on Ignite Munching and various bugs that can affect it(and other useful information), you can read through this thread:

http://elitistjerks.com/f75/t110326-cataclysm_fire_mage_compendium/

Cauterize:

Ok. You just got saved by Cauterize, but you are about to die if you don’t get a big heal. There are a couple of things you can do here. First, the most effective way to survive this is to hit Ice Block. It completely removes the dot left by Cauterize (you can cancel it right after or choose to stay in it until you get a heal or two). Another thing you can do is to Evocate through the dot (if you have Glyph of Evocation), Mage Ward and Mana Shield will also absorb some of the damage. Then there are your bandages, lock stones etc.

Preparing for a boss fight:

Always check and make sure you have a full 3 stack Mana Gem. You don’t want to be out of mana and go for something that’s not there. Most fights you shouldn’t need to evocate (usually only for Madness, DS). Use your Mana Gem as soon as you burn about 13k mana and use it on cd. For Madness(Dragonsoul last boss), don’t use your Mana Gem until after you use your first Evocate(and are 13k mana from full), this allows you to get the most out of your mana management abilities over such a long fight. (one Mana Gem between every Evocate)

Always make sure you are fully buffed and are full mana before the pull.

If there is going to be a countdown for the pull, you can hardcast a Pyroblast as your opener and follow with your rotation from there.

Staying Alive:

Lets face it. A dead dps is a useless dps.

Blink: Moves you 20 yards ahead (25 yards combined with Glyph of Blink). I know you can cast Scorch while moving but if you find yourself in the middle of something thats going to hurt. Blink out and dont risk the damage(if safe to do so).

Mirror Images: Although it is a high damage per execute, it is still a survival cooldown. If you pull threat, Images when popped will completely dump your threat for their duration, returning the boss back to the tank. It is a really good habit to save this for just such an occasion and gives time for the tank to build up threat again. Once it expires you get all of the threat back, but if the tank pulled enough threat, you shouldn’t pull again. To be safe you can pop Invisibility right after it to permanently drop the threat.

Ring of Frost and other cooldowns: Doing trash? Tank died and the mobs turn to you? Drop your ROF and kite them over it, use your Dragon’s Breath to disorient them into it or to gain distance. Frost Nova if they get too close or slow them with Blast Wave and kite. This just might buy some time to battle res a tank if your group chooses to do so.

Further Improving

Always be casting. Every second you spend not casting, you are losing dps. If you accidentally start casting a Fireball and realize you should have used Living Bomb, finish the cast anyways. If the target is going to die in a few seconds, it’s pointless to apply Living Bomb again unless most of it is going to tick off. When using the Heroic Will button on Ultraxion in Dragonsoul you can cast Fire Blast just as you hit the button for extra damage.

Knowing a fight well is a huge advantage for a dps. If you know you are going to have to move at a specific time or have to switch to an add that always spawns in the same spot, you can judge accordingly. For example, you are soaking crystals on Morchok and you know you have enough time for one Fireball but the second would be interrupted by the knockback half way through. You can cast a Scorch or something instead so that your global doesn’t go to waste (Scorch will not be interrupted by the knockback).

To get the most dps out of your Mage I suggest learning to use Rawr and Simulationcraft. This will help you get the most out of your toon in his/her current gear and maby learn ways to improve through the logs.

Macros:

Some of my favorite macros are:

#showtooltip combustion
/stopcasting
/cast combustion

Stops your casting and immediately activates Combustion. Good for when you just lined up the perfect Combustion but are in the middle of a cast.

#showtooltip ice block
/stopcasting
/cast ice block

Stops your casting and immediately Ice Blocks. Very nice for minimizing damage from Cauterize.

#showtooltip fireball
/cancelaura ice block
/cast fireball

By using this macro, your Fireball becomes a fast and easy way to remove your Ice block so you can get back to dpsing(once it is cancelled you are casting Fireball). You can link this to any ability you want, I chose Fireball because it just seemed easiest since Fireball is the filler.

#showtooltip counterspell
/stopcasting
/cast [target=focus] counterspell

Stops casting and Counterspells your focus target. Useful for when you have to interrupt a target without switching from your current one. Situational.

#showtooltip polymorph
/stopcasting
/cast [target=focus] polymorph

Stops casting and casts Polymorph on your focus target. Useful for keeping an enemy cc’d just in case it gets broken by damage or wears off. Avoids having to target them again if they are set to your focus.

/focus

Sets your current target to your focus. Faster than right clicking.

/clearfocus

Removes your focus target.